# Welcome

## Are you generating art for an NFT collection?

Check out our NFT generator:

{% content-ref url="/spaces/o9IBs7DeWK0IjMWTqEXb" %}
[Generator](https://docs.bueno.art/generator/)
{% endcontent-ref %}

## Are you creating an NFT contract?

Check out our Smart Contract Deployer:

{% content-ref url="/spaces/ssyCsE4Y48U29ewyYZFh" %}
[Smart Contract Deployer](https://docs.bueno.art/smart-contract-deployer/)
{% endcontent-ref %}

## Are you managing an NFT community?

Check out the Buenoverse:

{% content-ref url="/spaces/dnMYfhsZ5GJTgbm1KIe7" %}
[Buenoverse](https://docs.bueno.art/buenoverse/)
{% endcontent-ref %}


# Creating a Bueno Account

Connect your email or wallet to log in to your Bueno account.

Creating a Bueno account is super simple! You can choose to sign up for a Bueno account with your email, or Bueno can connect directly to your Ethereum wallet for authentication.

## Email Sign In <a href="#email-sign-in" id="email-sign-in"></a>

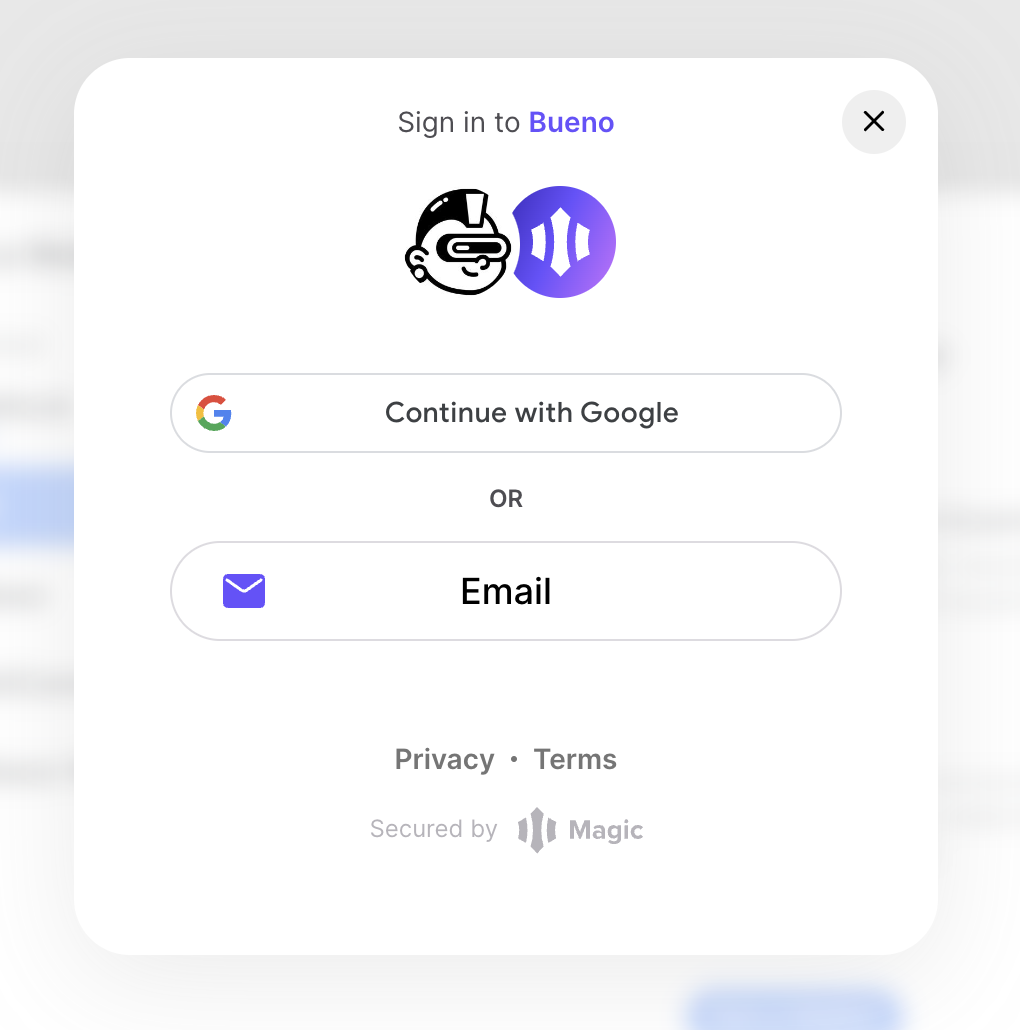
To sign in with your email, select the option and choose to continue with your Google account, or sign up with your email address.

<figure><img src="https://files.gitbook.com/v0/b/gitbook-x-prod.appspot.com/o/spaces%2Fo9IBs7DeWK0IjMWTqEXb%2Fuploads%2FY3iheXgK0TInYc1VB8Gn%2FCleanShot%202023-06-08%20at%2010.15.52%402x.png?alt=media&#x26;token=09e6dcc9-4c62-4540-9aa8-5ca0ef35f691" alt=""><figcaption></figcaption></figure>

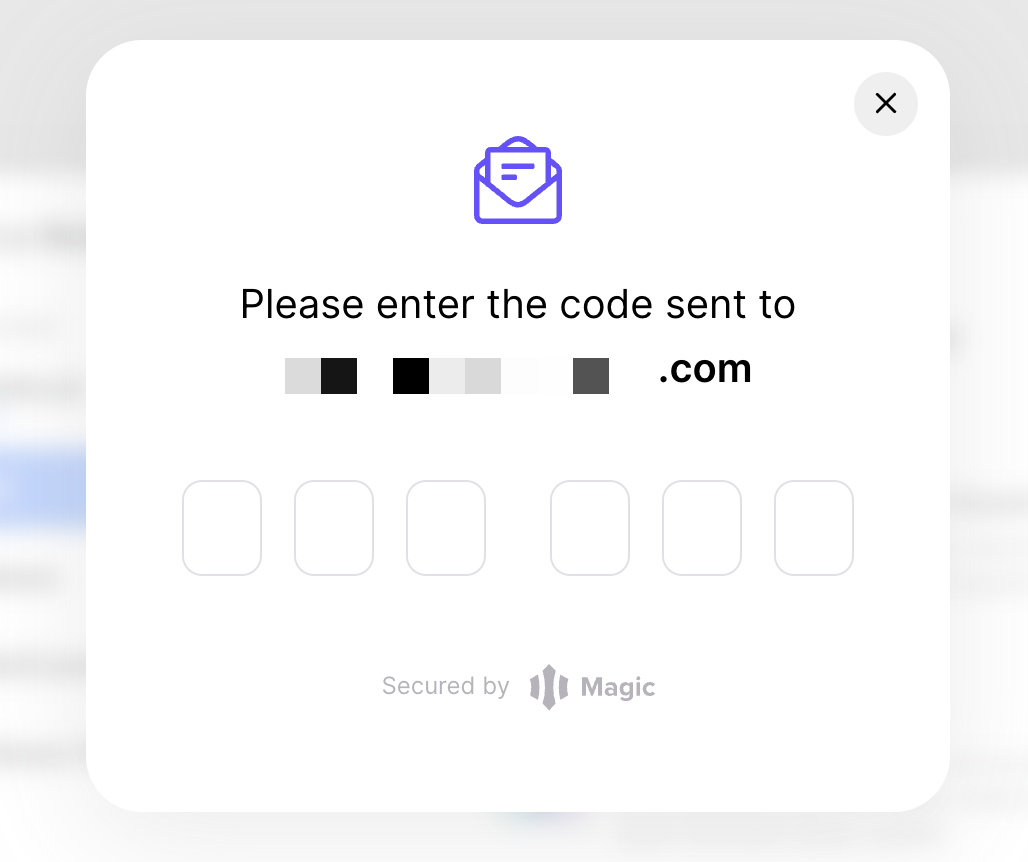
If you choose not to connect directly with your Google account, Bueno will send a code to your email address so you can finish signing in.

<figure><img src="https://files.gitbook.com/v0/b/gitbook-x-prod.appspot.com/o/spaces%2Fo9IBs7DeWK0IjMWTqEXb%2Fuploads%2FK2MZYlBDgOURJWWgLQ6Y%2FCleanShot%202023-06-08%20at%2010.18.26%402x.png?alt=media&#x26;token=7bb8ac51-8d33-40f1-9783-b85cc39c2d70" alt=""><figcaption></figcaption></figure>

Using the power of Magic, Bueno will assign an Ethereum wallet to your account. You can manage your wallet by selecting your account portrait, and navigating to **Show Wallet**.

<figure><img src="/files/f73X49vtrhgUPZabcaH7" alt=""><figcaption></figcaption></figure>

This will bring up your wallet management. From here, you can add funds to you wallet and view any collectables you own.&#x20;

<figure><img src="/files/K0bBurfuisoRpyLya02a" alt=""><figcaption></figcaption></figure>

## Wallet Sign In

If you already have a wallet, you can also use a MetaMask, Coinbase, Rainbow, or WalletConnect supported wallet to log in. Click the connect button in the upper right, then follow the prompts in the pop-up to connect your wallet to Bueno.

<figure><img src="/files/nPr4NmKtBSK2RmGywkON" alt=""><figcaption></figcaption></figure>

{% hint style="warning" %}
If you experience trouble logging in, double-check to make sure you’ve downloaded any browser extensions required to connect, and if you have a pop-up blocker, make sure it is disabled for Bueno.
{% endhint %}


# Pricing

## Bueno Art Generator and Smart Contract Deployer (ERC-721A)

At 0.00009 ETH per token, Bueno Generator pricing is **simple and straightforward** - no subscriptions, no passes and no pricing tiers - and Bueno doesn’t charge until you are ready to export your final batch of tokens.&#x20;

<mark style="background-color:orange;">**Sample Pricing Guide:**</mark>

> 1 token is 0.00009
>
> 100 tokens is 0.009 ETH
>
> 1,000 tokens is 0.09 ETH
>
> 10,000 tokens is 0.9 ETH

Bueno users have access to unlimited preview generations. We encourage creators to double (or triple!) check token images and metadata before paying for a generation export.

{% hint style="success" %}
Realized you made a mistake and already paid? Do not worry! Just contact Bueno support. For small changes, we'll regenerate a new tokenset for no additional cost.
{% endhint %}

The best part of our pricing? **There are no additional upfront costs!** Our [contract deployer](https://docs.bueno.art/v/smart-contract-deployer/introduction/overview) takes 5% of primary sales *only*. Plus, features such as [Forms](https://docs.bueno.art/v/bueno-forms/), [Collection Pages](https://docs.bueno.art/v/smart-contract-deployer/mint/collection-page), [Minting Tools](https://docs.bueno.art/v/smart-contract-deployer/mint/minting-tools) and [Buenoverse](https://docs.bueno.art/v/buenoverse/) are all included **for free**!

{% hint style="warning" %}
In order to use our contract deployer, users must generate a tokenset with the Bueno Generator, even if they generated the art else where. For more information, read about our custom uploader for [pre-generated and 1/1 collections](broken://pages/Rs8vSKASdipeH1OPve6s).&#x20;
{% endhint %}

## Bueno Drops Deployer (ERC-1155)

The [Drops deployer ](https://docs.bueno.art/bueno-drops/)**is also free to use,** you just pay gas to deploy. If you choose to sell your tokens, Bueno will take **5%** of primary sales, while secondary royalties are 100% controlled by you.&#x20;


# Plans

Unlock more with our Premium and Deluxe Plans!

All Bueno accounts will start out with the free plan, so you can start building your project right away.

Payment plans are available to scale with you as your project grows! Plan perks include:

* Additional member seats for projects.&#x20;
* Unlimited Buenoverse rooms.
* Added AI generation credits.
* Additional Buenoverse guest builders and moderators.&#x20;
* More Buenoverse players at a time.

Check out the **Plans** tab from your project settings to see all that Premium and Deluxe have to offer!

<figure><img src="/files/EjMa5Jixlb65wzEopPjV" alt=""><figcaption></figcaption></figure>


# Bueno Guide to Gas Prices

Uncover the hidden costs of creating a collection.

Crypto gas prices are in constant flux. Taking gas fees into account is an important part of any creator (and collector!) budget.

We've created this gas guide to help our creators estimate gas fees for common transactions you'll make while launching your collection in Bueno.

## About Gas Fees

<details>

<summary>The Basics of Gas Fees</summary>

The mechanics of gas fees can get pretty complicated, but you really just need to know the basics.

Each of the transactions you make with your wallet - including transfers/sales, purchases, and deployments - need fuel to finalize and record on the blockchain.

The amount of gas needed depends on the complexity of the transaction - just like the amount of gas needed in a car depends on the length and terrain of your road trip!

Gas prices are listed in GWEI. 1 GWEI is equivalent to 10^-9 or 0.000000001 ETH. You can keep track of gas prices using [Etherscan’s gas tracker](https://etherscan.io/gastracker).

</details>

<details>

<summary>How to Calculate Gas Fees</summary>

To get an estimation of your gas fees, you’ll simply multiply the gas units needed to complete a transaction by the current gas price.

<mark style="color:blue;">**transaction units**</mark>**&#x20;x&#x20;**<mark style="color:red;">**gas price**</mark>**&#x20;=&#x20;**<mark style="color:purple;">**gas fee**</mark>

</details>

## Common Bueno Transactions

<table><thead><tr><th>Transaction</th><th>Gas Units</th><th data-hidden></th></tr></thead><tbody><tr><td>Contract Deployment (ERC-721A)</td><td>~700,000</td><td></td></tr><tr><td>Drops Deployment (ERC-1155)</td><td>~600,000 for a token with any supply + ~100,000 for each additional token on the contract </td><td></td></tr><tr><td>Mint</td><td>~85,000</td><td></td></tr><tr><td>Airdrop (Single Wallet)</td><td>~85,000</td><td></td></tr><tr><td>ETH Transfer</td><td>~20,000</td><td></td></tr></tbody></table>

{% hint style="info" %}
Airdrop (and mint) gas fees have less to do with the number of NFTs being dropped, and more about the **number of wallets involved in the transfer.**&#x20;

For example, airdropping 10 NFTs to 1 wallet will be about the same as if you were airdropping 1 NFT to 1 wallet. However, dropping 10 NFTs to 10 wallets will cost much more.&#x20;
{% endhint %}


# Overview

Bueno's Smart Contract Deployer makes it easy to deploy an [ERC721A](https://www.erc721a.org/) smart contract on the Ethereum blockchain, with no-code. The ERC-721 standard is designed for minting unique tokens, which works perfectly for the art that you generate with Bueno.&#x20;

Contracts are deployed from **your wallet**, giving you full ownership over the contract and operations, once it is deployed.&#x20;

The deployer **is free to use,** you just pay gas to deploy. If you choose to sell your tokens, Bueno will take **5%** of primary sales, while secondary royalties are 100% controlled by you.

Bueno's contract deployer is audited for security & reliability. You can read the full audit report performed by 0xMacro [here](https://0xmacro.com/library/audits/bueno-art-3).

{% hint style="info" %}
**Note:** In order to use the Bueno Smart Contract deployer, you need to first [generate a collection](https://docs.bueno.art/v/generator/) in Bueno.&#x20;
{% endhint %}


# Capabilities

Below is the list of features that the **Smart Contract Deployer** currently supports:

* ERC-721A NFTs on the Ethereum, Base or Polygon networks
* Royalty enforcement compatible with [OpenSea's requirements.](https://support.opensea.io/hc/en-us/articles/1500009575482)
* As many minting phases as you need for your drop
* Simultaneous minting phases (let your collectors mint everything they're eligible for, eg 2x free 2x paid)
* Configurable prices in each phase of sale (including support for free mints)
* Configurable per-wallet maximums for each phase of the sale, including maximums set at the wallet level.
* Import an allowlist, or use a Bueno Form, to control who can mint
* Minting tools to facilitate your mint without needing to write any code
* Multiple reveal types: **Instant Reveal** or **Delayed Reveal**
* On-chain royalty metadata via EIP-2981
* Withdraw primary sale proceeds to multiple wallet addresses
* Bulk airdrop tokens to wallets of your choosing
* Burnable tokens

Let's jump in to creating your first contract with Bueno!


# What to Know Before You Deploy

Please read to learn important information you should know before you deploy your contract!

### <mark style="color:red;">**Once your contract is deployed, there are certain changes that cannot be made without deploying a new contract.**</mark>&#x20;

Once deployed, you cannot:

* Add a new mint phase.
* Edit the supply of a mint phase.
* Alter primary mint sales revenue split.&#x20;
* Change from instant reveal to delayed reveal.

### Additionally, some changes to the contract can *<mark style="color:orange;">only</mark>* be made *<mark style="color:orange;">**with limitations**</mark>*.&#x20;

This means while changes can be made, they will require modification outside of the Bueno app that we may not be able to assist with.&#x20;

These changes include:

* Setting new royalties percentage and royalties collection wallet.
* Changing the owner of the contract.
* Modifying token images and/or token trait metadata without completely changing already minted tokens. &#x20;

Unfortunately, we have no way of refunding gas fees associated with contract deployment. **We recommend double&#x20;**<mark style="color:red;">**(or triple!)**</mark>**&#x20;checking every aspect of your contract before you commit to deployment.**&#x20;

{% hint style="warning" %}
As user needs may differ depending on the project, this may not be a comprehensive list of changes that can't be made after deployment. **If you are unsure, please reach out to support before you deploy.**&#x20;
{% endhint %}


# Introduction

{% embed url="<https://www.youtube.com/watch?v=KHy1Al66soA>" %}
In this video, Pablo will show you how to set up your contract for launch. Continue to [Session 10: Deploying to Testnet](/smart-contract-deployer/contract-creation/step-5-deploying-your-contract#deploying-to-a-testnet) to learn how to test your deployment before the real deal.
{% endembed %}

If you're ready to start the process of deploying a smart contract so people can mint your tokens, you've come to the right place. This walkthrough will go through each step of the deployment & contract management process.

<figure><img src="/files/k2NTLXcCvR5s1zwA1JCS" alt=""><figcaption></figcaption></figure>

Click **Create a Smart Contract** and give it a name to begin the process.


# Step 1: Contract Information

First, you'll need to enter some basic information about your contract, including its name, token symbol, collection tokenset and blockchain network.&#x20;

<figure><img src="/files/QZDjXzJ6AeAlAFdB2jsX" alt=""><figcaption></figcaption></figure>

### Contract Name

Once your contract is deployed, this value cannot be changed. This name will be used on Etherscan next to your token symbol.

{% hint style="danger" %}
**Note: After you deploy, you** **cannot change** **contract name, token symbol, token set, network, supply levels or revenue split.** Changing these items will require you to scrap and redeploy your contract.&#x20;
{% endhint %}

### Token Symbol

This is the symbol that will represent your NFTs. When your token is minted/traded, this symbol will be used in applications such as Etherscan. We do not recommend a symbol of more than 5 alphanumeric characters.

### Collection Tokenset

Currently, the only way to deploy a Bueno smart contract is with art that you generated through the Bueno product. This includes [custom uploads](https://docs.bueno.art/v/generator/guides/creating-your-first-project/pre-generated-and-1-1-collections) for pre-generated art and 1 of 1 collections. Once you've finished creating your art and you've paid for an export, you'll be able to select the collection and tokenset.&#x20;

### Network

Bueno supports deploying contracts on Ethereum, Base and Polygon. This will influence the currency collected during your mint -- if deployed to Ethereum or Base, the currency is **ETH**. If deployed to Polygon, the currency is **MATIC**.


# Step 2: Pricing and Sale Phases

With the Bueno deployer, you can set up **as many sale phases as you want, while also allowing you to run multiple simultaneously**. This way, you can tailor your drop to be as sophisticated or simple as you want.&#x20;

All sale phases have customizable options for price, supply and per wallet maximums. For more information about what each customization field means, skip to the end of the doc [here](#sale-customizations).&#x20;

Once your contract is deployed, you can still update certain settings about your phases. The only thing you cannot change is the supply. You can also activate/pause different sale phases at any time.

{% hint style="danger" %}
**Note:** While price, sale state, max per wallet, and allowlists can be changed after deployment with a gas fee, supply **cannot be changed after deployment.**&#x20;
{% endhint %}

After your pricing is set, Bueno will calculate your approximate earnings on the right.&#x20;

<figure><img src="/files/tjhPm5nHZjY1aKu4GBZf" alt=""><figcaption></figcaption></figure>

## Minting Phases

{% hint style="success" %}
With the Bueno deployer, you can set up **multiple sale phases during your pre-sale period to run at the same time**. This way, you can attach several allowlists with various settings.
{% endhint %}

If you intend to have at least one pre-sale phase for your minting, select **+ Add** to create a new mint phase. A settings modal will pop up so you can customize your phase name, supply, price, per wallet maximum. This is also where you will attach any allowlists needed for your phases.&#x20;

<div><figure><img src="/files/zu8KAO3P6ccKyjLBSEAA" alt=""><figcaption></figcaption></figure> <figure><img src="/files/L8ikMAbh1biNIHMw6tlo" alt=""><figcaption></figcaption></figure></div>

Phases can be created with or without allowlists, and you can update the pricing at any time after the contract is deployed.&#x20;

If your tokens are free, **we strongly suggest** **that you use an allowlist** for your pre-sale to prevent bots from draining your supply.

### Allowlists

If you collected a list of wallets that you want to ensure are the only ones allowed to mint in your sale phases, you can toggle on the allowlist featur&#x65;*.* If you created an allowlist with Bueno Forms, you will be able to easily connect that list here.

<figure><img src="/files/Z3bLB0XKzj2mCMbLqi8t" alt=""><figcaption></figcaption></figure>

{% hint style="success" %}
Bueno uses a Merkle Tree to build the allowlist, to help you save on gas fees.&#x20;
{% endhint %}

If you have a list that you collected without Bueno, you can also upload that here by selecting **+ Create New List**. You can either upload your list as a CSV file or enter the wallets manually.&#x20;

<figure><img src="/files/VhujVj4NMoX9c1c20t52" alt=""><figcaption></figcaption></figure>

Just like with price, you can update or completely change your allowlist any time after the contract is deployed.&#x20;

Addresses that appear in multiple allowlists will see all available minting options when they connect. If a user is not on an allowlist, they will not see the additional pre-sale minting phases listed once they connect.&#x20;

<figure><img src="/files/QPGgvhuemnvq8jxU6VBL" alt=""><figcaption></figcaption></figure>

### Public Sale

Once you activate the public sale, anyone can mint your tokens. Supply does not need to be set for public sale - by default, it will use whatever tokens weren't allocated to a sale phase. **If a sale phase doesn't mint out, you can "end" the phase, transferring the remaining supply into your public phase.**

<figure><img src="/files/vP8ZYb28SjZPaU5gPCVZ" alt=""><figcaption></figcaption></figure>

## Sale Phase Customizations

### Price

Enter the ETH value for your different sale phases here. If you want to support a free mint in either the presale or public sale, you can toggle the price off. If your tokens are free, **we strongly suggest** **that you use an allowlist** for your pre-sale to prevent bots from draining your supply.

### Supply

This is the total amount of tokens that can be minted from your smart contract. For a pre-sale, this number must be smaller than your public sale supply. For public sale, **this value is capped** at the total number of tokens that you generated with Bueno.

### **Per-Wallet Maximum**

This is the total number of tokens that can be minted per wallet address. If you want to ensure each person is only allowed to mint a certain number of tokens, enter a value here.

### Global Limits

While you can set various wallet maximums across your sale phases, you'll also have the option to set a universal wallet maximum for convenience. If you have both a phase wallet max and a global wallet max, both will be checked before a user can mint.&#x20;

{% hint style="info" %}
Global max will override a phase max. This means that if the global max (ex: 1) is set lower than the phase max (ex: 2), the collector will only be able to mint the amount set in the global max (1).&#x20;
{% endhint %}

<figure><img src="/files/wm9IP5ODcmlktInYi7Q6" alt=""><figcaption></figcaption></figure>

###


# Step 3: Revenue Split and Royalties

{% hint style="danger" %}
**Note:** While price, sale state and allowlists can be changed after deployment with a gas fee, **revenue split cannot be changed after deployment.**
{% endhint %}

## Primary Sales **(Mint)**

When your users mint their tokens, this is considered a primary sale. By default, Bueno will configure that 95% of the minting proceeds go to the wallet you are connected with, while the remaining 5% goes to Bueno as a service fee. If you don't charge for your tokens, this section will not be relevant to you and can be ignored.

<figure><img src="/files/uony1q89R0mQNihB1ylc" alt=""><figcaption></figcaption></figure>

If you would like greater control into how primary sale proceeds are distributed, you can add up to 4 wallets to split the fees. Keep in mind the final percentages must add up to 100%.

## **Secondary Sales (Royalties)**

Once a token is minted in the primary sale phase, it will automatically begin to appear on most popular marketplaces, including OpenSea. This will let your token holders re-sell the tokens they minted from you, and as the creator of those tokens, you can specify a royalty percentage that should be paid to a wallet of your choosing.&#x20;

Some marketplaces will automatically enforce the royalty percentage you've set, but others may not. Additionally, some marketplaces may require a request to list on their marketplace.&#x20;

Most creators will primarily use OpenSea to collect royalties. Keep reading for more information about OpenSea's latest royalties update!

### **OpenSea's Operator Filter Registry Update for Bueno Contracts**&#x20;

As of November 8, 2022, OpenSea is enforcing on-chain royalties with their **Operator Filter Registry**. If you do not opt-in, OpenSea will still list your collection, **but they will not enforce royalties settings**.&#x20;

You can opt into it by toggling on **Enforce Royalties** when deploying the contract. **This will subscribe you to OpenSea's Operator Filter Registry to prevent your tokens from being traded on marketplaces that do not enforce creator royalties.** &#x20;

<figure><img src="/files/3eJrE3I4gHERv1GI7PJ4" alt=""><figcaption></figcaption></figure>

You can learn more about the change in [OpenSea's official support docs](https://support.opensea.io/hc/en-us/articles/1500009575482).


# Step 4: Features

The Bueno Contract Deployer provides two optional features for users - delayed reveal and burn functionality. We'll walk through both features and how they work.&#x20;

{% hint style="danger" %}
**Note:** If you deploy without delayed reveal or burnable tokens turned on, **you cannot add them without deploying a new contract.**&#x20;
{% endhint %}

### Delayed Reveal

If you want to create a sense of anticipation/suspense for your token minters, you can turn on **Delayed Reveal**. During this step, you can upload your placeholder image. Your token metadata will be the placeholder image until you decide to reveal.

<figure><img src="/files/wzNpZH9HriaFbzgLXUK6" alt=""><figcaption></figcaption></figure>

When you're ready, you can reveal your tokens from the [contract management page](/smart-contract-deployer/contract-management/metadata-management).&#x20;

{% hint style="info" %}
We recommend uploading a placeholder image that is at least 750px by 750px for the best-quality display on Opensea.
{% endhint %}

To view changes in marketplaces such as Opensea, make sure your holders hit "refresh metadata."&#x20;

If you turn delayed reveal off, your tokens will be revealed to users as they are minted. Tokens that haven't yet been minted will be hidden until they are minted.

### Burnable Tokens

The burn feature enables a holder to remove their token from circulation while reducing the supply on the contract. If you just transfer a token to a burn address without the burn function, the total supply on the contract won't change, that token will just no longer be tradeable.&#x20;

<figure><img src="/files/rkZ5Tat5J4uUbAvhcGVK" alt=""><figcaption></figcaption></figure>

{% hint style="warning" %}
**Note:** The toggle makes it so that the "burn" function on the contract can be called. Builders still have to build something that makes use of the burn mechanism.
{% endhint %}


# Step 5: Deploying Your Contract

Now for the fun part: deploying your smart contract! This page will display a summary of your contract. You can go back to the previous steps if you made any mistakes.

<figure><img src="/files/chyoRWewSp3y5nNKRMxh" alt=""><figcaption></figcaption></figure>

Once you feel good about your contract settings, click "Deploy Contract". This will take several minutes to compile the custom-generated Solidity code for your sale. Once it's finished, you'll receive a confirmation from your connected wallet to perform a blockchain transaction. **You will need to pay gas** for this transaction to go through.&#x20;

### Deploying to a Testnet

{% hint style="danger" %}
Testnet for Bueno deployments on Ethereum, Base and Optimism are currently down while we work to support Sepolia. Thank you for your patience and understanding!
{% endhint %}

{% embed url="<https://www.youtube.com/watch?v=qLrutVZ7H9w>" %}
In this video, Pablo will walk you through how to deploy your smart contract on a testnet. [Continue to Session 11: Deploying to Mainnet](#deploying-to-mainnet) to learn how to launch your contract on the blockchain.
{% endembed %}

A testnet is a place where you can safely test your smart contract, without worrying about spending real ETH or MATIC. It's an environment that resembles what the flow will look like on the mainnet. **Currently, Bueno supports testnet for Polygon contract deployments only.**

Because a testnet is still a blockchain, you will need **fake MATIC** in order to make transactions. This will require you to retrieve funds from a Faucet. Below are several faucets that can be used:

#### Ethereum Network Faucets&#x20;

**Polygon Network Faucets (Token Tracker:** **MATIC):**

* [**https://faucet.polygon.technology/**](https://faucet.polygon.technology/) **(Powered by Polygon)**
* [**https://mumbaifaucet.com/**](https://mumbaifaucet.com/) **(Powered by Alchemy)**

After you deploy to testnet, you can continue to the next page to learn how to manage your deployed contract.

### Deploying to Mainnet

{% embed url="<https://www.youtube.com/watch?v=AWL_fooC08E>" %}
In this video, Pablo will show you how to launch your contract on the blockchain. Continue to [Session 12: Managing Your Smart Contract](/smart-contract-deployer/contract-management/contract-page-overview) to learn about how to manage your contract and mint after deployment.&#x20;
{% endembed %}

Once you feel confident with your testnet contract, the process to deploy to mainnet is identical! The only difference is that you will need to use real ETH or MATIC to pay the gas for deployment.


# Marketplace Management

Once your contract has been deployed to either a Testnet or Mainnet, you will automatically be able to view your minted tokens on marketplaces like OpenSea.

{% hint style="info" %}
**Note**: Marketplaces won't create a storefront for your collection until at least 1 token is minted. You can use the [Airdrop Tool](/smart-contract-deployer/mint/minting-tools#token-airdrop) within Bueno to do this before starting your sale.
{% endhint %}

Once a collection is created, you will be able to manage it via the wallet you used to deploy your contract through Bueno.

If you'd like to learn more about managing your collection on OpenSea, check out their documentation [here](https://docs.opensea.io/docs/8-customizing-your-storefront#:~:text=Clicking%20on%20the%20edit%20button,%2C%20description%2C%20and%20website%20URL.).&#x20;

To learn more about managing your collection on LooksRare, check out their documentation [here](https://docs.looksrare.org/guides/collection-management/adding-collection-information).&#x20;

{% hint style="info" %}
**Tip:** OpenSea & LooksRare both have testnet support for previewing your tokens.

OpenSea: <https://testnets.opensea.io/>

LooksRare: <https://goerli.looksrare.org>
{% endhint %}


# Allowlists Introduction

Bueno supports adding allowlists to your sale phases, to give you complete control over who can mint your tokens. An allowlist paired with a max per wallet rule is a great way to ensure all of your collectors are able to mint your tokens. Read on for how to add and manage your allowlists.


# Creating/Importing Your Allowlist

Bueno supports importing allowlists from an external CSV (in case you collected wallets with an outside service), but you can also collect wallets through [Bueno Forms](https://www.bueno.art/forms)!

Once you begin creating your contract, you'll be able to select or import your allowlist. If you collected wallets with Bueno Forms, you'll be able to find them in the dropdown menu. Otherwise, you can import a CSV by clicking **Add New**.

To get started, create a sale phase (described in [Step 2: Pricing and Sale Phases](/smart-contract-deployer/contract-creation/step-2-pricing-and-sale-phases#minting-phases)) and click the "Allowlist" toggle.

<figure><img src="/files/LexRTmfrfSEbQv1m95aW" alt=""><figcaption><p>To create a new allowlist, select "Create New List". To import a Bueno form as an allowlist, select it from the dropdown.</p></figcaption></figure>

## Mint Maximums with Allowlist

Want to set wallet mint maxes for your allowlist? Just add an additional column to your allowlist. Then, set the wallet max with the corresponding wallet address. The wallets in your allowlist can have the same wallet max, or different wallet max allotments. Once you're done, the allowlist should look something like this:

<figure><img src="/files/ShOXkXDqGUaxE51XmlCz" alt=""><figcaption></figcaption></figure>


# Changing or Adding an Allowlist During Mint

If your list wasn't finalized when you deployed your contract, or you realized you forgot to add a bunch of collectors, *don't worry!* Bueno lets you update your contract, there are just a few important things to keep in mind.

To start, navigate to your Bueno contract dashboard and hover your mouse over the phase with the allowlist you intend to update. Click the pencil icon next to the phase.

<figure><img src="/files/p4EDRUSBtp1eXLrPGSm8" alt=""><figcaption><p>Hovering over a phase will reveal a Pencil icon, which you can click to change the Phase settings</p></figcaption></figure>

From here, you have a couple of options:

* Create a completely new allowlist (either by importing a CSV, or entering wallets manually).
* Select a Bueno form to import wallets from.
* Disable the allowlist.
* Add an allowlist to a phase that doesn't have one.

<figure><img src="/files/FKSBSH3PG9b5tuM5p0Vj" alt=""><figcaption></figcaption></figure>

{% hint style="success" %}
Bueno **automatically** updates your minting page & minting widget to use your new allowlist once you've made the update.&#x20;
{% endhint %}

&#x20;


# Contract Page Overview

{% embed url="<https://www.youtube.com/watch?v=C75AhFgdz0o>" %}
In this video, Pablo will show you how to manage your contract and mint after deployment.&#x20;
{% endembed %}

The contract management page has all the functionality needed to manage your drop without having to be a tech wizard! You can access the contract management page from the Launch section of your collection. Here, you'll also be able to manage your tokensets and customize your minting experience.

<figure><img src="/files/sCD2RFklbfsNio5QGIfg" alt=""><figcaption></figcaption></figure>

Here you'll be able to change certain things once your contract is deployed, such as minting maximums, allowlist settings and price.&#x20;

You'll also be able to change the state of your sale (Open -> Pre-Sale (if applicable) -> Public Sale), withdraw any accrued funds, verify your contract on Etherscan and more.&#x20;

{% hint style="warning" %}
**Note:** After your smart contract is deployed, it may still be possible to edit tokens and metadata - **only with help from** [**Bueno support**](https://discord.gg/pfRcBJMwH8). Once minting has started, Bueno cannot make changes to your token set without changing what has already been minted. **We strongly recommend that you triple-check every detail of your contract before you deploy.**&#x20;
{% endhint %}

You can view your contract on Etherscan at any time, by clicking the tan link next to your contract name at the top.

<figure><img src="/files/DZTTOJ1RASvtod71bEdz" alt=""><figcaption></figcaption></figure>

To learn more about each feature, continue on!


# Sale Management

In the **Phases** **&** **Sales** section of the contract manager, you can edit the price, max per wallet, allowlist, and name of each phase. You can also start/stop/end phases at any time.&#x20;

<figure><img src="/files/3mjXCxmmso84RDGN5rjJ" alt=""><figcaption><p>An example contract with 2 phases active simultaneously</p></figcaption></figure>

This is also where you can [airdrop](/smart-contract-deployer/contract-management/airdrops) any tokens before, during or after your sale.&#x20;

### Starting a Phase

Initially, all of your phases will start in a paused state, to prevent anyone from minting until you're ready to start your sale. At any time, you can select your phase(s), and "Open" them to begin the minting process.

<figure><img src="/files/mbOiloU4RQTGJEGRvdZH" alt=""><figcaption></figcaption></figure>

You will need to pay gas for this transaction. You can open and re-close your sale at any time.&#x20;

### Pausing a Phase

To pause a phase and prevent people from minting further tokens, you can select your phase(s) and choose the "Pause" option.&#x20;

### Ending a Phase

To irreversibly close a phase, you will select the "End Phase" option for your phase(s). This will transfer any unminted tokens into Bueno's default "Public Sale" phase. **Once you end a phase, it cannot be reopened.**&#x20;

<figure><img src="/files/P2uXsOh9VgxE8fcMMrlH" alt=""><figcaption><p>Since this phase had no mints, all 100 tokens are transferred into the "Public Sale".</p></figcaption></figure>

### Editing a Phase

To edit a phase, simply hover over the phase with your mouse. A pencil will appear, allowing you to make changes to the phase settings.

<div><figure><img src="/files/jta81HcxAcOIgGB5IA5Q" alt=""><figcaption></figcaption></figure> <figure><img src="/files/ugi9mZ6woA25rmgUUNof" alt=""><figcaption></figcaption></figure></div>

### Global Limits

If you want to add/change the global max per wallet, you can do so by clicking the gear icon. This will bring up a menu to add/remove/change the global max per wallet.

<div><figure><img src="/files/dCkblPk0z9fz8iwt45lC" alt=""><figcaption></figcaption></figure> <figure><img src="/files/Rwi73KCHLO7KUSfOD3Kq" alt=""><figcaption></figcaption></figure></div>

As a reminder, the **global max per wallet** tracks mints across **all phases**, including public.&#x20;

### Contract Balance

This queries your smart contract to see how much ETH it has accumulated from your primary sale. You can withdraw these funds at any time by clicking the "Withdraw" button. This will distribute the funds according to the rules you specified in the [revenue step](/smart-contract-deployer/contract-creation/step-3-revenue-split-and-royalties) of the contract creation process. You will need to pay gas for this transaction.

{% hint style="danger" %}
**Note:** Revenue split **cannot be changed** after deployment.&#x20;
{% endhint %}


# Airdrops

### Token Airdrop

Need to gift some tokens to yourself/your team? Want to send some tokens for free to prominent members of your community? The Airdrop feature will let you do this.

<div><figure><img src="/files/G4u8Sq9jZtMyIi1XDFUQ" alt=""><figcaption></figcaption></figure> <figure><img src="/files/0ul8WRzsWjY5Dy6rWyXt" alt=""><figcaption></figcaption></figure></div>

You can airdrop to a single wallet, or you can configure a CSV list to bulk airdrop to multiple addresses. Just specify the number of tokens, the sale phase to debit from, and the wallet address(es), and then click **Airdrop**. This will require you to pay gas to mint the tokens to the specified wallets.

{% hint style="info" %}
**Tip**: Airdropping allows you to bypass all minting restrictions (like max per wallet). It also works even if the sale is closed. You only have to pay for gas.&#x20;
{% endhint %}


# Metadata Management

In this section, you will be able to manage your token metadata. Once you deploy on the mainnet, this is also where you will be able to reveal your tokens if you turned on [delayed reveal](https://docs.bueno.art/v/smart-contract-deployer/contract-creation/step-4-features#delayed-reveal) during contract creation.

<figure><img src="/files/ICeJZcjGvaCPhQ8Otjtw" alt=""><figcaption></figcaption></figure>

Read on to learn more about each section of the metadata manager.&#x20;

### Metadata Protection

This section will only appear if you are managing a contract that is deployed to a testnet. This is *enabled* by default, to prevent your token metadata from leaking while you are performing tests. If you aren't concerned with a metadata leak, you can toggle it off, and your metadata/images will be as they would be during your Mainnet minting.

### Reveal Tokens

If you chose to do a delayed reveal, this is where you can switch your artwork to a "revealed" state. All unminted tokens will remain hidden until they are minted.

### Token Metadata Preview

This is a handy link to view the metadata of Token #1. If the token hasn't been minted yet, you will not be able to see any metadata. You will see placeholder metadata if you are doing a delayed reveal. You will see the actual metadata for Token #1 if you are doing an instant reveal.

### Metadata Hosting

To facilitate different reveal mechanics, metadata is initially hosted by Bueno. At any time you can switch your metadata/images to be hosted on IPFS. **This is strongly encouraged** once your minting has concluded, as Bueno cannot guarantee the indefinite hosting of your assets. To learn more about uploading to IPFS, check our [guide](https://docs.bueno.art/v/generator/generation-and-tokenset-management/upload-to-ipfs-with-nft.storage).


# Revenue and Royalties

{% hint style="danger" %}
**Note: These details cannot be edited once the contract is deployed.** Make sure everything looks correct before deploying your contract to the main net to prevent gas fees for multiple deployments.&#x20;
{% endhint %}

This section of the contract page will let you view revenue and royalty splits next to the associated wallets. Go over this information on the test net before moving to main net to prevent deploying with errors.&#x20;

<figure><img src="/files/8OFcu3Z3vaXIEspYQUvX" alt=""><figcaption></figcaption></figure>

Sometimes mistakes happen! If any of these details about your contract need to be changed, you can select Edit Contract in the top right of you contract management page. **Anything that cannot be changed in the contract management page will require a new deployment.**&#x20;

<figure><img src="/files/KeeKyX2U1cdHLiUzPWXf" alt=""><figcaption></figcaption></figure>


# Contract Verification

Your smart contract is automatically verified when it is deployed to the Blockchain. This provides transparency to your collectors that the contract is not doing anything unsafe with their funds.


# Going to Mainnet

If you made it here, congratulations! You've successfully gone through a Testnet deploy, played around with the different management options available in the Bueno dashboard, and are ready to do the real thing.

If you aren't quite ready yet or discovered an issue while testing on a testnet, don't worry! You can go back to the "Deploy" tab, tweak any settings necessary, and then re-deploy your contract to a testnet.

{% hint style="warning" %}
**Note:** After your smart contract is deployed, it may still be possible to edit tokens and metadata - **only with help from** [**Bueno support**](https://discord.gg/pfRcBJMwH8). Once minting has started, Bueno cannot make changes to your token set without changing what has already been minted. **We strongly recommend that you triple-check every detail of your contract before you deploy.**&#x20;
{% endhint %}

Once you've triple-checked everything, you can select **Deploy to Mainnet.**&#x20;

<figure><img src="/files/ij6vi6fYylx2NfIEvdhP" alt=""><figcaption></figcaption></figure>

You will be directed to the deploy page once again, but this time for mainnet. As a reminder of what this step entails, check out [Step 5: Deploying Your Contract](/smart-contract-deployer/contract-creation/step-5-deploying-your-contract).

<figure><img src="/files/akewOCIyWNmapLwubkQx" alt=""><figcaption></figcaption></figure>


# Minting Tools

The **Minting Tools** section of the launch page is where you can customize either a Bueno-hosted mint on your Bueno collection page or a minting widget for your website.&#x20;

<figure><img src="/files/lBCFsW3wrnbsRF5DAIbg" alt=""><figcaption></figcaption></figure>

## Minting Tools

Now that you have a smart contract, you might be wondering how to mint your NFTs. We provide two easy-to-use options.

{% hint style="info" %}
**Tip**: Minting can be done directly from the contract via Etherscan as long as you don't have an allowlist associated with the minting phase.&#x20;
{% endhint %}

### Bueno-hosted Collection Page

We offer a couple of customization options to get started with a fully hosted minting page. You can upload a thumbnail and background image, customize the button color, and add rich text to describe your project, add social media links, and more. The end result looks something like this:

<figure><img src="/files/NpYZjq3hUL4XVNiZPVlx" alt=""><figcaption></figcaption></figure>

{% hint style="info" %}
Collectors will only be able to see the phases their wallets are able to mint in the Bueno minting widget. This applies to both the dynamic widget in the collection page, as well as the embeddable widget.
{% endhint %}

### Embeddable Mint Widget

The Bueno mint widget lets you host the minting experience from your own website, without having to worry about the code involved in the minting process. Simply copy the embed code, and insert it onto your webpage. It supports all the same features as the minting page.

{% hint style="warning" %}
**Metamask iFrame Bug:** The Metamask desktop browser extension is not compatible with the mint widget if the embed code is placed in an iFrame. *This is a Metamask native bug, and unfortunately we do not have a way to fix it on our end.*&#x20;
{% endhint %}

<figure><img src="/files/oIjyS9BkYoJYjJIjqsNr" alt=""><figcaption></figcaption></figure>


# Collection Page

No website? No problem!

Don't have the time or resources to build your own website for your project? No worries! The Bueno Page Editor is an easy-to-use tool to help creators set up an informative webpage that doubles as a mint site in just minutes!&#x20;

Let's walk through all the customizable options to help you get started!

Navigate to the page editor by selecting **Launch** in the collection tool bar, and navigating to **Page** in the side bar.

<figure><img src="/files/oEh01DsBH7qGSE0R5r1O" alt=""><figcaption></figcaption></figure>

To start editing, just click directly on the areas that you'd like to customize. You can set page images, page title and connect your social links.

<figure><img src="/files/4SwICOsDdtal5igBNNHA" alt=""><figcaption></figcaption></figure>

To customize page settings such as title, description and accent color, navigate to the cog symbol in the upper right.

<figure><img src="/files/5raJRlDBBehUNZvlqgyN" alt=""><figcaption></figcaption></figure>

Finally, you can edit your dynamic mint widget by hovering over the widget header image area and selecting the cog icon. This is where you can attach a Bueno form to your mint page before mint opens.&#x20;

<figure><img src="/files/gg1WOoJIZvyY5hI1sfq3" alt=""><figcaption></figcaption></figure>

When you are done customizing your page, simply select the **Publish** button in your collection tool bar. Here, you can customize your page url and set your page to public view by hitting the toggle on the right.&#x20;

<figure><img src="/files/pgl7XyFBuVt4H1uz8pv9" alt=""><figcaption></figcaption></figure>

Now that you're published, share your link, and you can open you mint! Once you open your mint phases, your collectors will be able to select the widget and begin to mint their tokens. &#x20;

<figure><img src="/files/ysLWAcDOScbb7ZwTv7Ks" alt=""><figcaption></figcaption></figure>

{% hint style="info" %}
If you have included phases with allowlists set, collectors will only be able to view the phases that their wallet can mint.&#x20;
{% endhint %}

As tokens are minted, they will appear in the tokens section of the page, to the right of the home page.&#x20;

<figure><img src="/files/ISp4nqZ7PEurJh2OJ2Bj" alt=""><figcaption></figcaption></figure>


# Marketing Assets

Create marketing assets from your token art in seconds.

Bueno's Marketing Asset generator allows you to create seemless marketing assets for you to share on social media.

To get started, navigate to **Launch > Marketing Assets**, and select **Create Now.**&#x20;

<figure><img src="/files/6s1WrRb8Hl1cwhJXhi83" alt=""><figcaption></figcaption></figure>

Next, select asset size based on your type of post, and pick a template.

<div><figure><img src="/files/TkDRY1qC0yVapDAhbrVq" alt=""><figcaption></figcaption></figure> <figure><img src="/files/afmJr2uOxHOdWgELyQXd" alt=""><figcaption></figcaption></figure></div>

Use the shuffle button to find the perfect look!

<figure><img src="/files/wFcdNzqj9etcZj0alwi8" alt=""><figcaption></figcaption></figure>

Finally, select **Save & Download** to download a copy of your asset directly to your desktop.


# Removing Un-minted Tokens to Cap Total Supply

Remove un-minted tokens from your contract supply.

Sometimes the demand for a collection isn't as high as anticipated, and that's perfectly alright! There's no shame in having a few tokens left over in your public mint supply after a sale.

You can now remove any un-minted tokens from your collection and set a final cap on your public supply.&#x20;

{% hint style="info" %}
When ending a sale phase outside of your public sale phase, the supply will automatically be moved to the public sale supply.&#x20;
{% endhint %}

**Follow the steps below to get started!**

1. First, head over to your smart contract dashboard by navigating to **Launch > Contract.**
2. Look for your **Public Sale** phase. Click on it and select **End Phase.**

<figure><img src="/files/mK1KjyJXc4Wykya5wwpN" alt=""><figcaption><p>Step-by-step video to cap your total supply.</p></figcaption></figure>

3. We take the integrity of your collections seriously. <mark style="color:red;">**Please read the warnings provided**</mark> to ensure you understand the implications of permanently closing your sale.
4. To proceed, type in the name of your collection.
5. Finally, select **Close Sales**. This action will confirm that you are choosing to cap the supply of your collection **permanently.**

{% hint style="warning" %}
**Important Warning:**

Before you make this decision, remember you'll:

* **Prevent Further Minting:** No additional tokens can be minted after permanently closing your sale. This caps your collection.
* **Remove Unminted Tokens:** All the unminted tokens will be permanently removed. They'll vanish, never to be seen again.
* **Irreversible Action:** Think of this as setting your collection in stone. Once done, you won't be able to recover the unminted tokens in the future.
  {% endhint %}


# Opensea Operator Filter Registry (Retired Sept. 1, 2023)

Find out how Opensea's change affects your collection👇

**As of September 1, 2023, OpenSea has retired their Operator Filter Registry** and will no longer enforce royalties on newly deployed contracts.

If you registered with the Operator Filter Registry by August 31, 2023, **Opensea will continue to honor forced royalties settings** **through the end of February, 2024.**&#x20;

## **How to check if your contract is subscribed:**

1. Visit the [OperatorFilterRegistry contract on Etherscan](https://etherscan.io/address/0x000000000000aaeb6d7670e522a718067333cd4e#readContract), and navigate to **Contract > Read Contract.**
2. Scroll to "5. filtered operators."
3. Under "registrant," past your collection's contract address.
4. Select "query."

If you see a list of addresses, your contract is successfully subscribed to the Operator Filter Registry. If you see no addresses, you are not subscribed.&#x20;

## **How to un-subscribe after deployment:**

1. Visit the [OperatorFilterRegistry contract on Etherscan](https://etherscan.io/address/0x000000000000AAeB6D7670E522A718067333cd4E#writeContract), and navigate to **Contract > Write Contract.**
2. Connect your deployer wallet to Web3.&#x20;
3. Scroll to "7. unsubscribe."
4. For "registrant" field, paste your collection's contract address.
5. For "copyExistingEntries (bool)," write "false."
6. Click "Write." You'll have to sign with your wallet and pay a small gas fee to remove the subscription.

{% hint style="danger" %}
**Note:** Now that the registry is retired, this action is **permanent.** Once you've unregistered, **you will not be able to re-register to apply forced royalties in Opensea again.**&#x20;
{% endhint %}


# Changing Base URI

If for any reason you need to change your collection's base URI after mint, you can do so via Etherscan.&#x20;

Steps:

1. Navigate to your contract page on Etherscan. You can do this by copy-pasting your contract's address into the Etherscan search bar.&#x20;
2. Connect your deployer wallet to Web3.
3. Scroll to Contract > Write > 20. setBaseURI.
4. Insert your new base URI in the following format, taking care to include the trailing slash

```
ipfs://[CID]/
```

5. Hit write, sign and pay a small gas fee to apply the change.


# Introduction

Use Bueno integrations and plugins to improve your workflow.

In this section, we will go over all of the integrations available for the Bueno tools.&#x20;


# Adobe Express

Create a Bueno Drop directly from Adobe Express with the Bueno add-on.

With the Bueno add-on for Adobe Express, you can create a new drop directly from your Adobe Express project!

{% embed url="<https://www.youtube.com/watch?v=mJA1IPFlW04>" %}

{% hint style="info" %}
The Bueno Add-on for Adobe Express is **only compatible with Bueno Drops (ERC-1155)**, and is not compatible with generative collections (ERC-721A).&#x20;
{% endhint %}

To get started, open your project in Adobe Express and select the **Add-ons** button at the bottom of the left-hand side bar.&#x20;

<figure><img src="/files/sfYkKjriuLNvJNw0IyQz" alt=""><figcaption></figcaption></figure>

Next, select the Bueno add-on from the menu. If you have not yet installed the add-on, you can use the search bar at the top.&#x20;

<figure><img src="/files/RbVI9s59LbmiIxzBZkXT" alt=""><figcaption></figcaption></figure>

<figure><img src="/files/dKaJCfzR2yPFRYTvFuoO" alt=""><figcaption></figcaption></figure>

Clicking the Bueno add-on will bring up the Bueno tool bar on the right side of your project. Here, you'll sign in with your Bueno account wallet or email address.&#x20;

<figure><img src="/files/4s2hMC1wkI3JUPQWnB25" alt=""><figcaption></figcaption></figure>

Once you've signed in, you can navigate to your different projects in Bueno, and create your new Drop collection in that project by selecting **+ New Collection**.&#x20;

<figure><img src="/files/kc5P6c1tc246G6xdzIpd" alt=""><figcaption></figcaption></figure>

Now, you can select the pages you'd like to export to Bueno. You can select one or multiple. Then, click the **Create Collection** button - Bueno will take care of the rest!

<div><figure><img src="/files/3KUwNUr0F6MvduRI4eLj" alt="" width="563"><figcaption></figcaption></figure> <figure><img src="/files/b7Tq1oJixCXcoLtnb38B" alt=""><figcaption></figcaption></figure></div>

Select **Launch Collection** to open your Bueno Drops collection management page, and customize your drop's settings. Then, you'll follow the [Bueno Drops](https://docs.bueno.art/v/bueno-drops/create-a-drop/step-2-customize-settings) guide as normal.&#x20;

<figure><img src="/files/6Fq8J216XGxmbb85QBsv" alt=""><figcaption></figcaption></figure>

If you need to add a new page to your collection from Adobe Express, the Bueno add-on will let you add more to your past collections. Simply select the collection to which you'd like to add additional art.&#x20;

<figure><img src="/files/5SMn9JfkzFXXzsEN8jkz" alt=""><figcaption></figcaption></figure>


# Figma - Bueno Exporter

Learn how to install the Bueno Exporter plugin for Figma.

{% hint style="warning" %}
**Note:** The Bueno plugin only works with the Figma desktop application, and cannot run through the browser application.&#x20;
{% endhint %}

## Installation

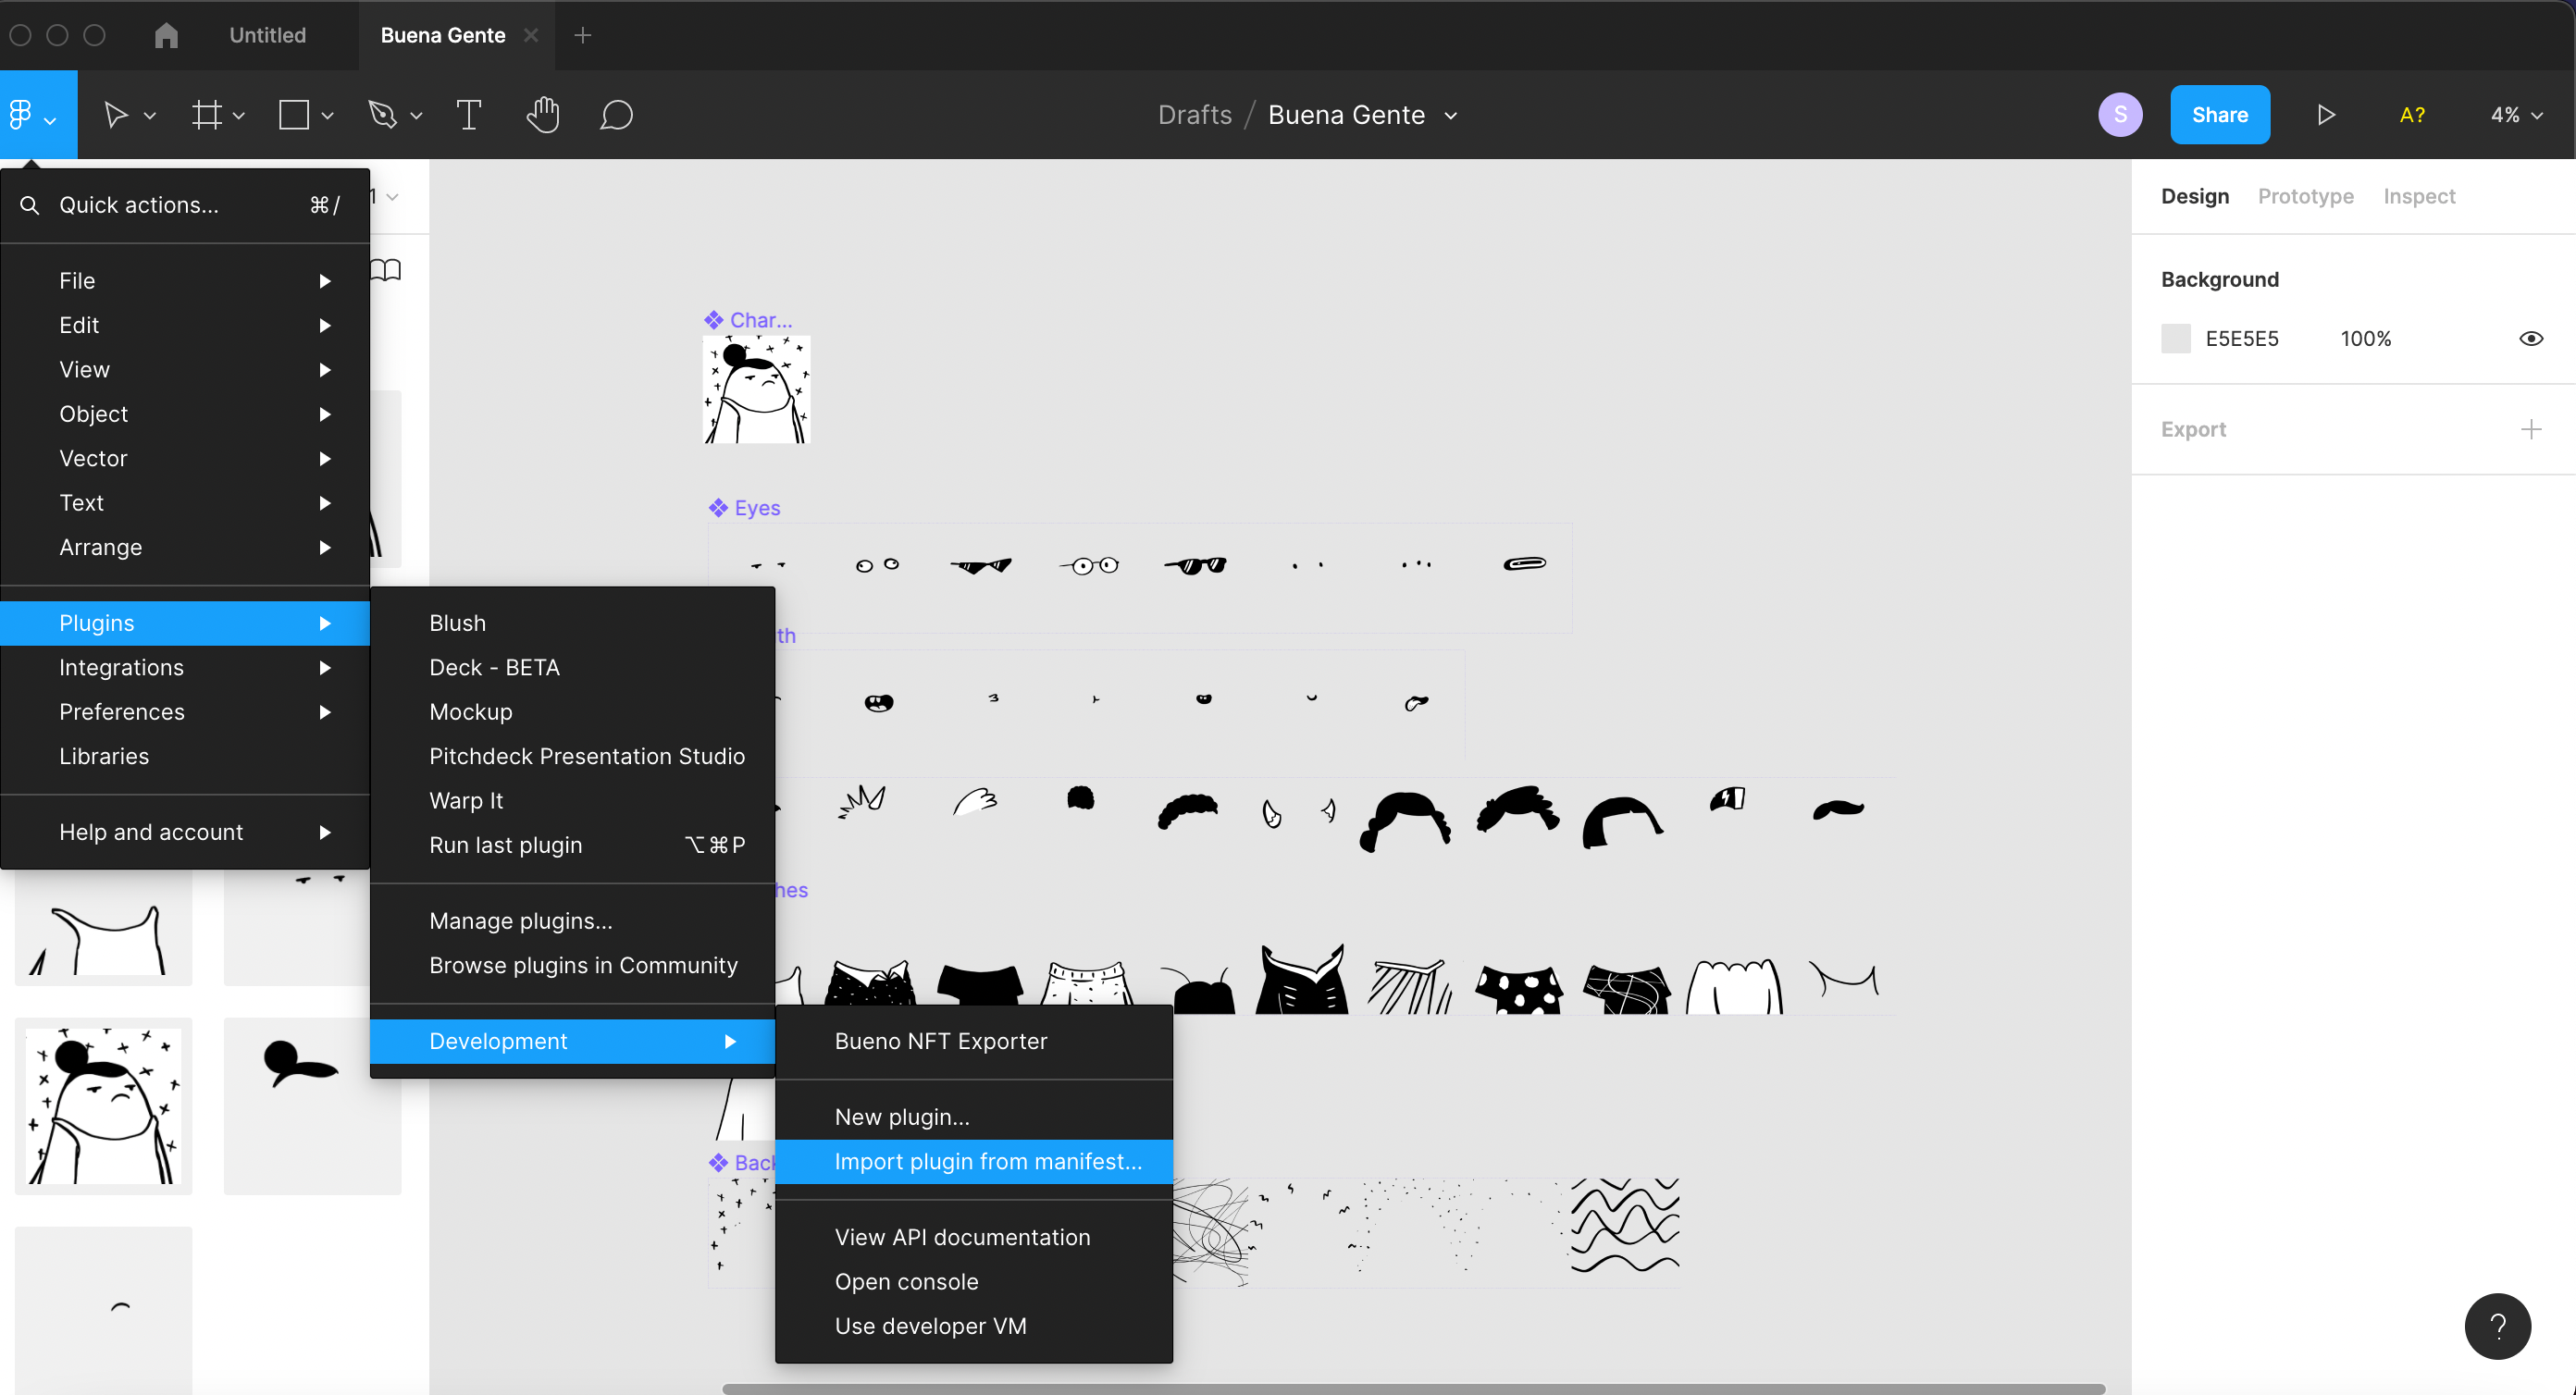
First, [**download the Bueno Figma plug-in**](https://app.bueno.art/downloads/bueno-figma-exporter.zip)**.** Then, open the Figma menu and navigate to **Plugins > Development > Import** **from manifest**.&#x20;

<figure><img src="https://files.gitbook.com/v0/b/gitbook-x-prod.appspot.com/o/spaces%2Fo9IBs7DeWK0IjMWTqEXb%2Fuploads%2Fla5Shl2NsWhiKW3JUPIr%2FCleanShot%202022-02-02%20at%2015.55.54%402x.png?alt=media&#x26;token=8b9e6b8f-6802-4ddc-b401-8c5360bccae2" alt=""><figcaption></figcaption></figure>

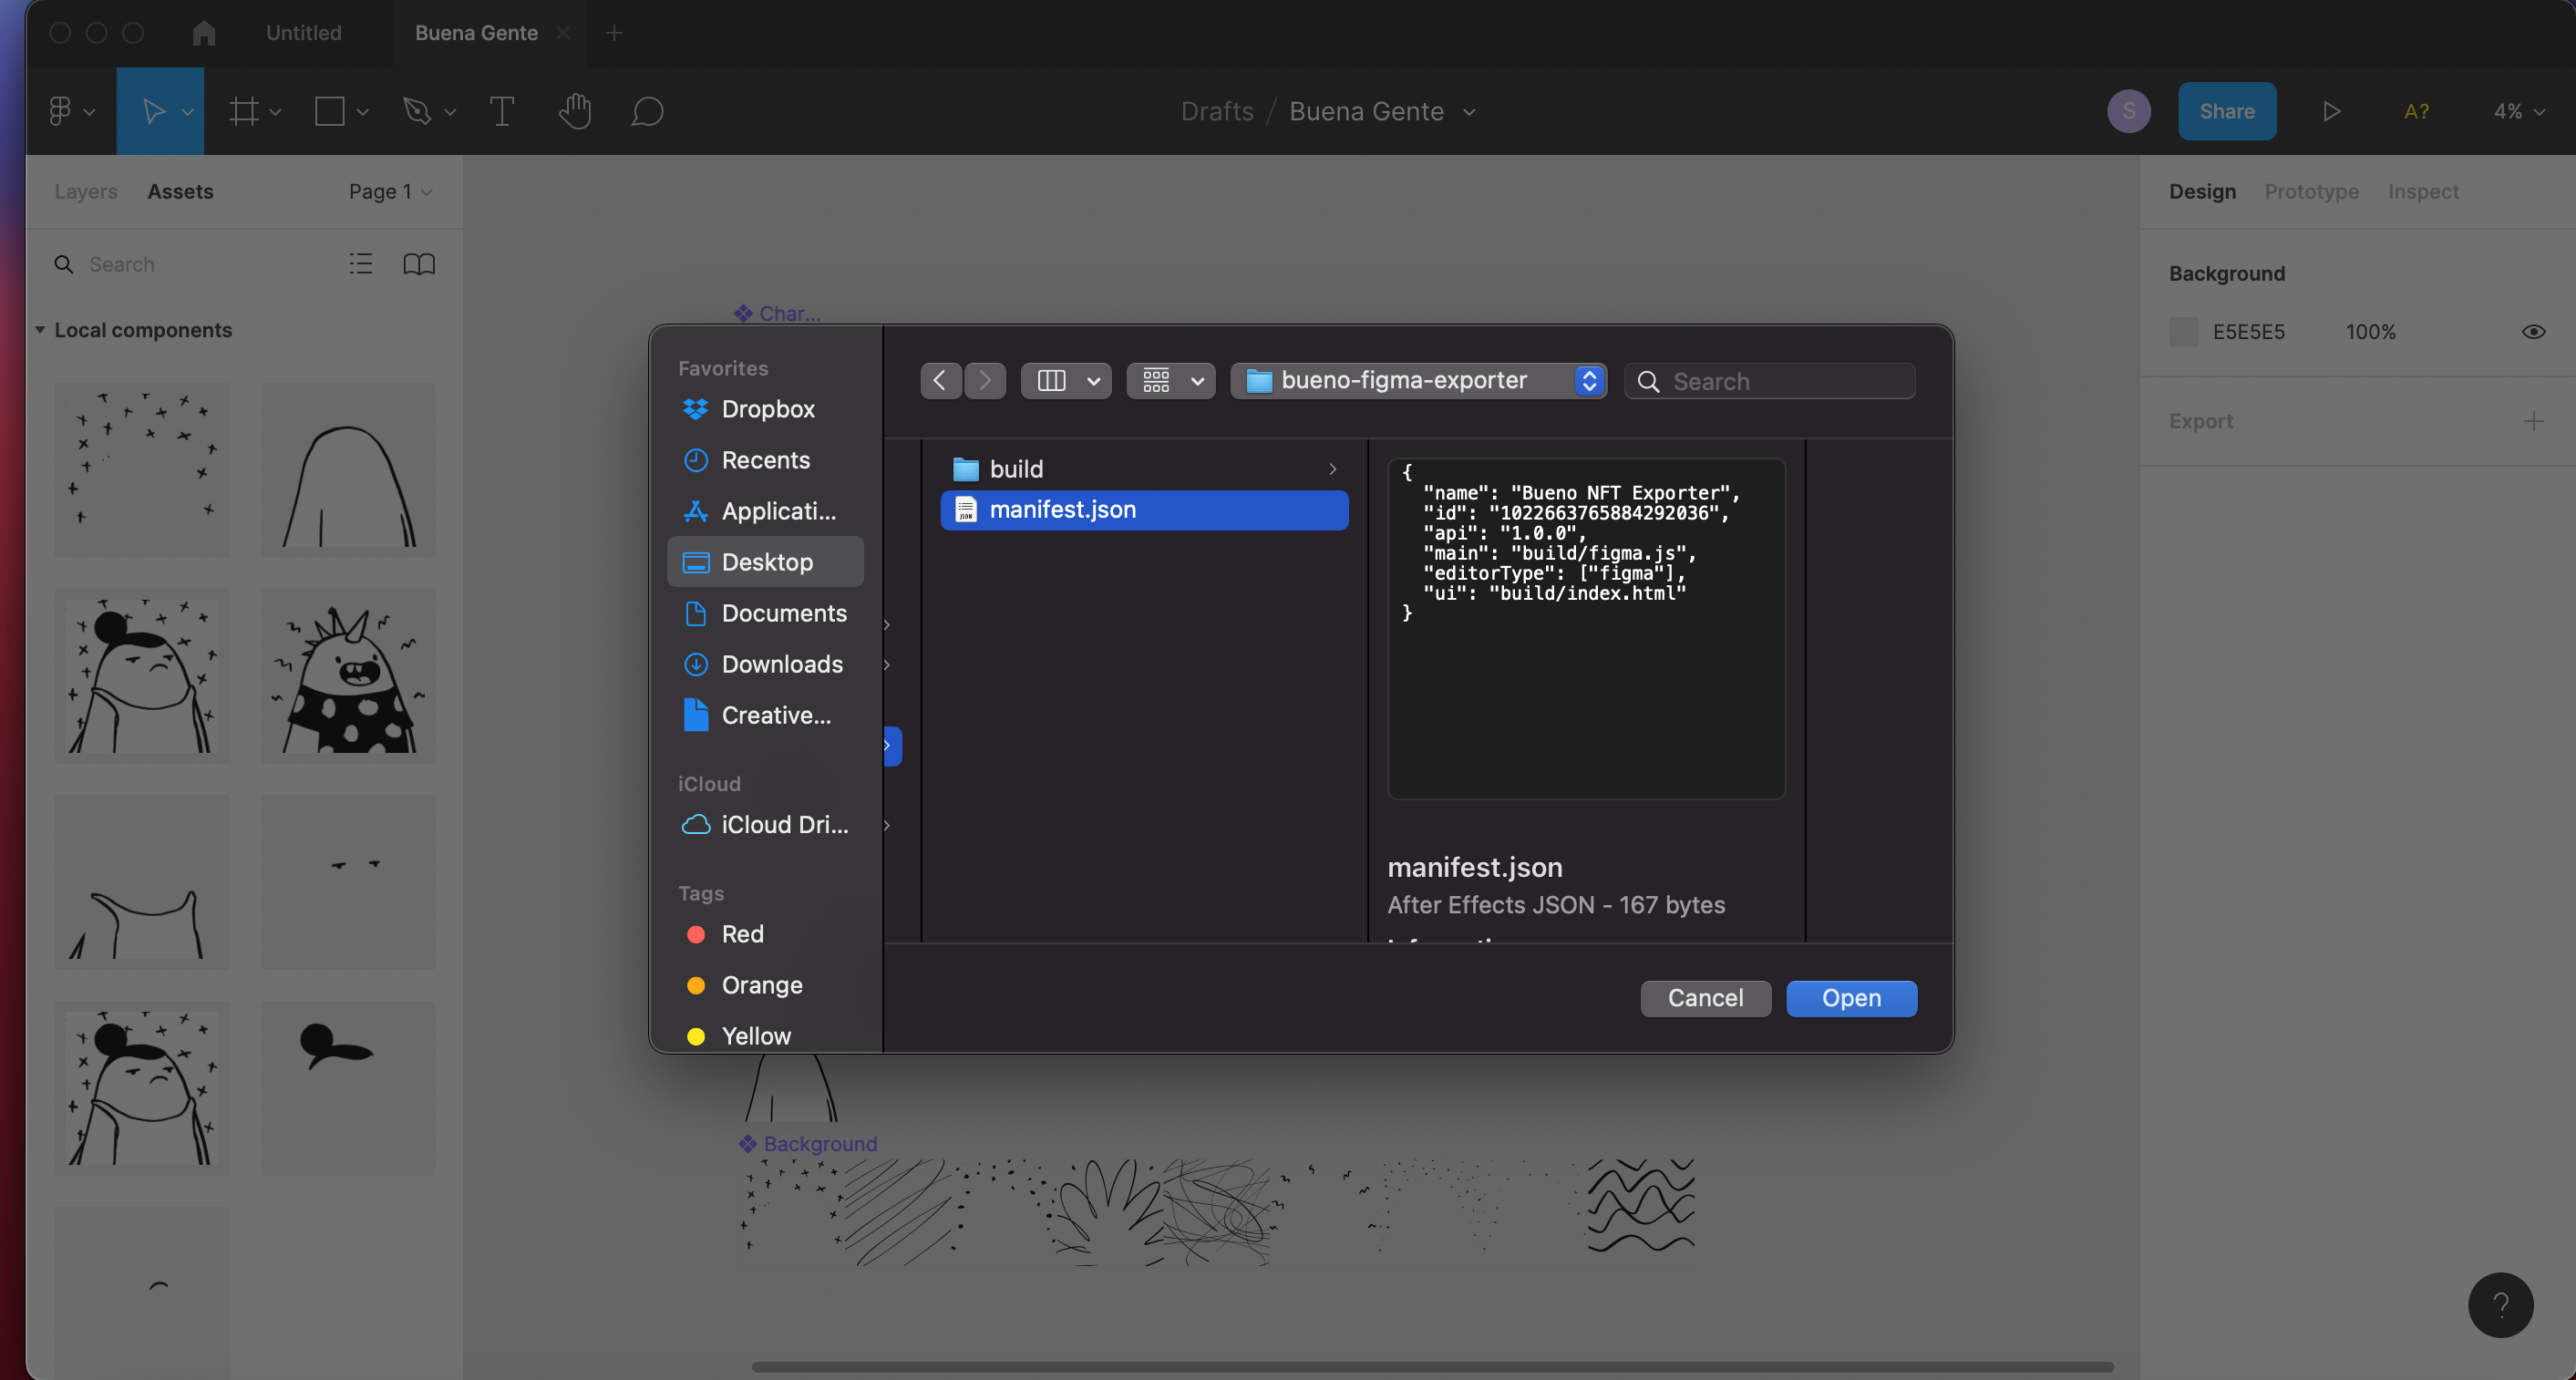
Next, select the manifest.json from the **bueno-figma-exporter** folder.

<figure><img src="https://files.gitbook.com/v0/b/gitbook-x-prod.appspot.com/o/spaces%2Fo9IBs7DeWK0IjMWTqEXb%2Fuploads%2F9Ei5c6oUpbwuIMnZI74U%2FCleanShot%202022-02-02%20at%2015.59.01%402x.png?alt=media&#x26;token=78734e6f-aedd-4daf-bd76-12f1001f95b4" alt=""><figcaption></figcaption></figure>

You should get a notification at the bottom of your Figma canvas confirming the installation. Now, you can run the plugin by selecting **Figma > Plugins > Development > Bueno NFT Exporter**.

To use the plugin, simply select your parent component, choose your file format (SVG or PNG), and select export. The Bueno plugin will do the rest!

## Preparing Your Assets with Figma

In order to prep your Figma file to use the Bueno Plugin, you’ll need to organize your traits into component sets. For an overview of components in Figma, follow this [link](https://help.figma.com/hc/en-us/articles/360038662654-Guide-to-Components-in-Figma).

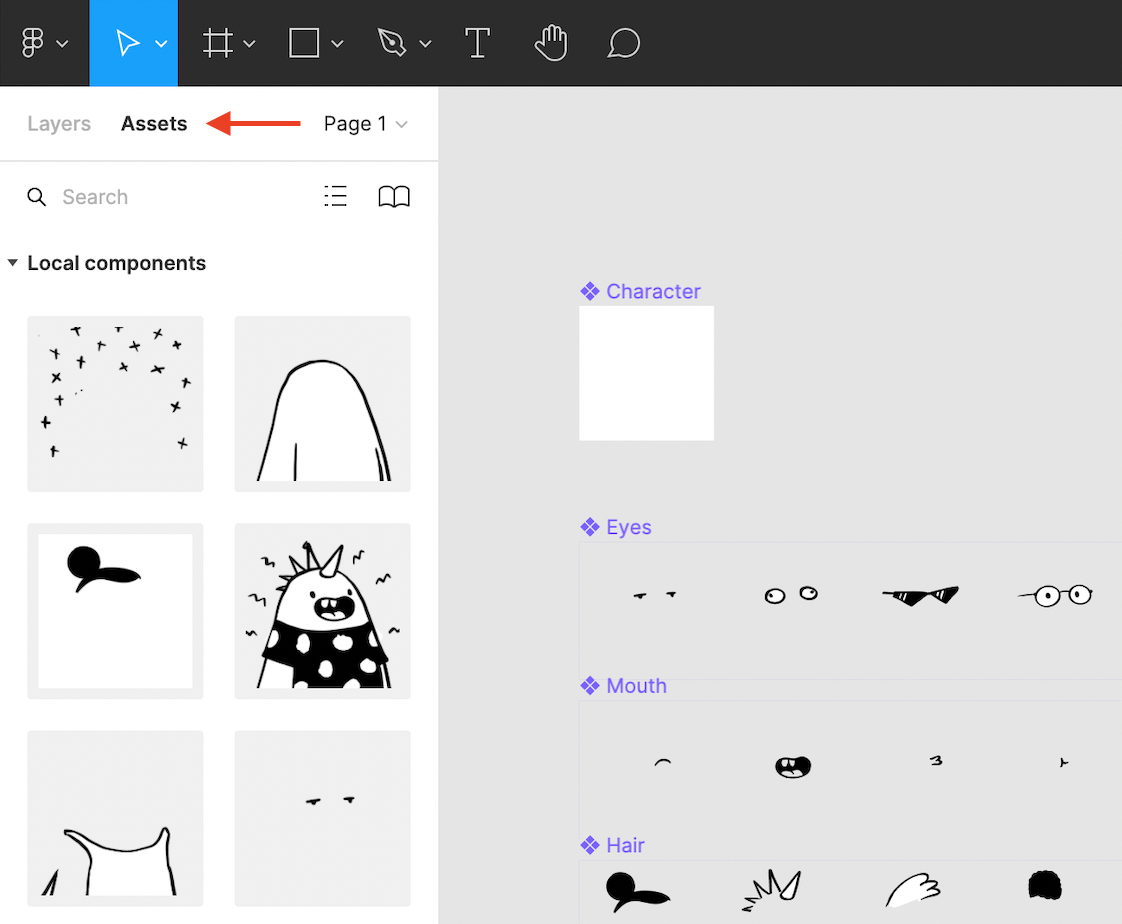
When organizing your assets, make sure you select create component set from the component menu at the top-center of your Figma canvas.​​ Then, you can load all your assets into a single component to prep for export with theBueno NFT Exporter plugin. To do this, first create a new, blank component frame. Then, select the assets panel on the left. You can drop an instance of each of your local components from here into the new component frame. Alternatively, you can copy and paste instances of each component set into the component frame.

<figure><img src="https://files.gitbook.com/v0/b/gitbook-x-prod.appspot.com/o/spaces%2Fo9IBs7DeWK0IjMWTqEXb%2Fuploads%2FN0eO8V2ptYmZLZIfrEL1%2FCleanShot%202022-06-15%20at%2010.40.09%402x.png?alt=media&#x26;token=66945919-6d6d-41bd-899e-774dd0e5d9f5" alt=""><figcaption></figcaption></figure>

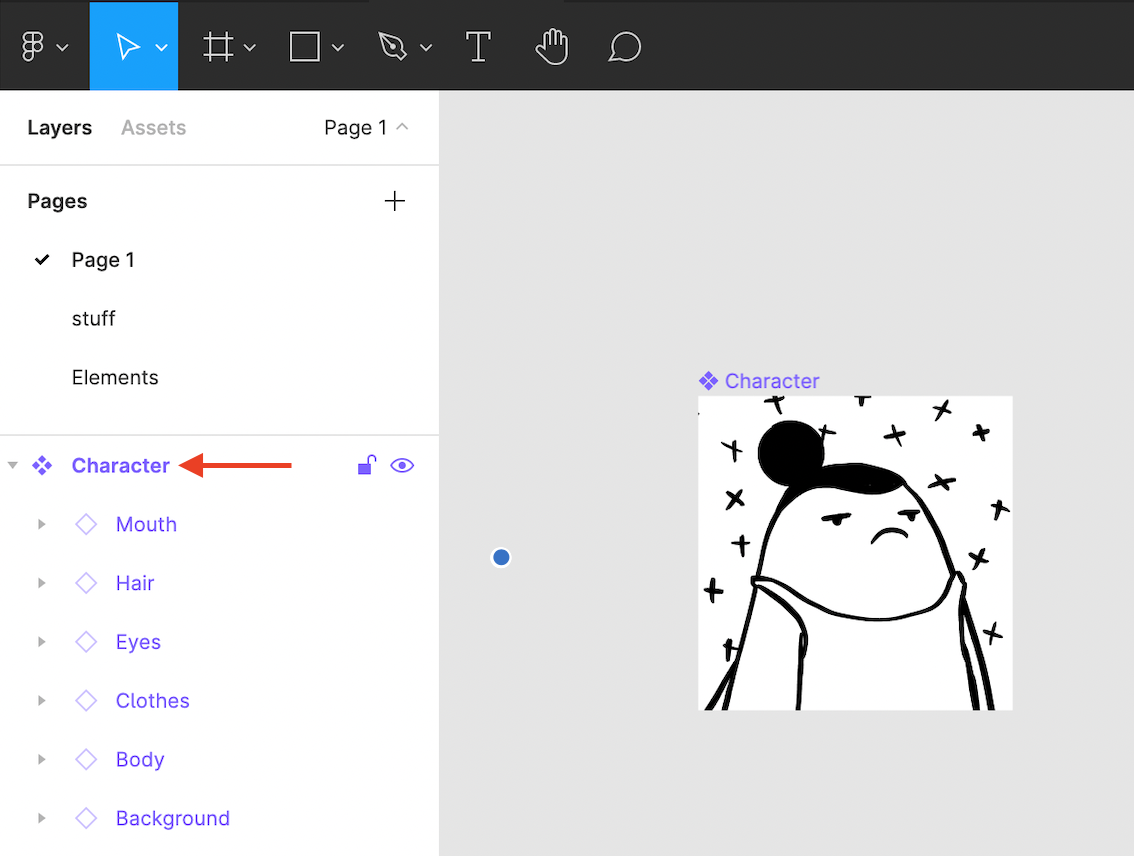
When you go back to the layers panel, you should see empty triangle markers to the left of each component layer. Don’t worry that only one trait is showing - the Bueno exporter will export all variations of each component.

<figure><img src="https://files.gitbook.com/v0/b/gitbook-x-prod.appspot.com/o/spaces%2Fo9IBs7DeWK0IjMWTqEXb%2Fuploads%2F90qFcSJGXgsdGzvcqR5p%2FCleanShot%202022-06-15%20at%2010.47.59%402x.png?alt=media&#x26;token=f2c41c4f-270f-42d6-b7da-5596aa2f9ec5" alt=""><figcaption></figcaption></figure>


# Figma - Bueno Drops

From Figma to the blockchain in just a few clicks!

With the [Bueno Drops plugin for Figma](https://www.figma.com/community/plugin/1271396551618777105/bueno-drops), dropping a new collection has never been easier!&#x20;

### Download the plugin [here](https://www.figma.com/community/plugin/1271396551618777105/bueno-drops) to get started!

You can also add the plugin by opening your Figma project and selecting **Figma > Plugins > Manage plugins**.

<figure><img src="/files/mWeDdK1KH96qvyBTonnY" alt=""><figcaption></figcaption></figure>

Next, search for **Bueno Drops**, and select from the results list to add.&#x20;

<figure><img src="/files/Ot7DGjopIg1FLhBYibGH" alt=""><figcaption></figcaption></figure>

Once you have the plugin open, log in with your Bueno account. Select **Drop** to start building a new collection.

<figure><img src="/files/3aJOEfhWHbsd2QjiW6om" alt=""><figcaption></figcaption></figure>

Follow the instructions by clicking and dragging to select all the image frames you'd like to upload into your drop.

<figure><img src="/files/HNtE93t7v8MrKgLUcHjJ" alt=""><figcaption></figcaption></figure>

Name your collection and pick your file type. The Bueno Drops plugin supports **PNG, SVG** and **JPEG**. Then, select **Create Drop** in the bottom right.&#x20;

<figure><img src="/files/vyUwqmh0Q6QoqRVNQeiQ" alt=""><figcaption></figcaption></figure>

After you hit **Create Drop**, you'll have the opportunity to add additional images to your collection. Finally, select **Continue.** The Bueno Drops plugin will import your art into Bueno in seconds!

{% hint style="success" %}
&#x20;If you need to come back to your drop later, don't worry! The Bueno plugin will save your work.
{% endhint %}

<figure><img src="/files/6zPssuL0exHYaIdEpm4B" alt=""><figcaption></figcaption></figure>

Once your art is in Bueno, the plugin will direct you to your Bueno Drop collection page. Here, you can [customize your Drop as normal](https://docs.bueno.art/v/bueno-drops/create-a-drop/step-2-customize-settings). When you're ready to launch your collection, just hit **Drop**!

<figure><img src="/files/x8EqIkT8LU1TGLeCCm6u" alt=""><figcaption></figcaption></figure>


# Piñata

Upload your collection to IPFS directly in Bueno with the Piñata integration.

Bueno offers an "Upload to IPFS" feature via [Piñata](https://pinata.cloud/) that will upload all of your token assets and metadata. For most collections, you will need to upgrade your Piñata subscription, as there are limits on the free tier. If you're looking for a completely free one-click upload, check out our [NFTStorage guide](https://app.gitbook.com/o/V7YJOo341zI53QMpzWxt/s/o9IBs7DeWK0IjMWTqEXb/generation-and-tokenset-management/upload-to-ipfs-with-nft.storage).

### Before you begin: <a href="#before-you-begin" id="before-you-begin"></a>

Sign up to Piñata -[https://www.pinata.cloud](https://www.pinata.cloud/)​

**Note***:* Depending on the size of your token set, you may need to change your plan. The free plan has a 1 GB storage limit and uploading will fail once you exceed it.

### Creating an Admin Piñata JWT <a href="#creating-an-admin-pinata-jwt" id="creating-an-admin-pinata-jwt"></a>

Sign up/log in to Piñata and navigate to the API Keys page.

<figure><img src="https://downloads.intercomcdn.com/i/o/484616389/bc6cd45eb958b11af3558d9c/Pinata+1.jpg" alt=""><figcaption></figcaption></figure>

Click the **New Key** button and fill in the form:

* Enable the Admin toggle
* Give your key a recognizable name

Copy all of this information to a secure location.

**Note:** Bueno only requires your JWT.

<figure><img src="https://downloads.intercomcdn.com/i/o/484616415/ec1808cbd1705ac0818eafb4/Pinata+2.jpg" alt=""><figcaption></figcaption></figure>

### Upload to IPFS From Bueno

After you generate a token set you'll see the **Upload to IPFS** button.

<figure><img src="/files/7KraUfsRWXOcDmiBtrkk" alt=""><figcaption></figcaption></figure>

**Important:** Bueno will use your JWT to create a single-use API Key. The key will appear in your [Piñata API Keys](https://app.pinata.cloud/keys) and can be revoked at any time.

![](https://downloads.intercomcdn.com/i/o/484620605/3c2bdf89870078b057a0ec36/Pinata+key.jpg)

Once your token set has been uploaded you'll be able to copy the **Base URI.** You can use this URI to see all of your metadata on the IPFS network. If you aren't launching your collection with a Bueno smart contract, then your developer will most likely need this URL.


# Frequently Asked Questions

## About Bueno

<details>

<summary>What is Bueno?</summary>

With Bueno, you can easily generate and deploy 10k NFT collections—no code needed. How does it work? Just upload your assets, play with rarity, set rules, preview a token set, and generate your collection in minutes. Then, deploy your smart contract with the Bueno Deployer.&#x20;

Want to build a  community around your NFT collection? The Buenoverse is our 2D world builder where your community can come together to chat and play.&#x20;

## Our Tools

### [Generator](https://docs.bueno.art/generator/)

The Bueno Generator is a no-code tool for creators to easily generate NFT collections. Just upload your assets, curate your collection, preview a token set, and generate your collection in minutes.&#x20;

### [Smart Contract Deployer](https://docs.bueno.art/smart-contract-deployer/)

Bueno's Smart Contract Deployer makes it easy to deploy an [ERC721A](https://www.erc721a.org/) smart contract on the Ethereum blockchain, with no-code. The ERC-721 standard is designed for minting unique tokens, which works perfectly for the art that you generate with Bueno.

Contracts are deployed from **your wallet**, giving you full ownership over the contract and operations, once it is deployed.&#x20;

The deployer **is free to use,** you just pay gas to deploy. If you choose to sell your tokens, Bueno will take **5%** of primary sales, while secondary royalties are 100% controlled by you.

### [Buenoverse](https://docs.bueno.art/v/buenoverse/introduction/welcome-to-the-buenoverse)

The Buenoverse is a 2D experience with multiple worlds built by communities, in which all NFTs are welcome. We call all these connected worlds and happenings the Buenoverse.

The Buenoverse has a live, multiplayer design tool that allows builders to create their own world in an easy way to tell stories and bring utility to their collection. For players, it’s a platform in which they interact with their communities and friends. Players can use any of their NFTs as their characters and navigate the different worlds created by different communities, chat with others, play, and just hang out.

</details>

<details>

<summary>What blockchain networks does Bueno support?</summary>

The Bueno Generator lets you format your metadata for both Ethereum and Solana networks.&#x20;

The Bueno Smart Contract Deployer supports deploying ERC721A contracts to Ethereum and Polygon networks.

</details>

<details>

<summary>How much does Bueno cost?</summary>

### Generator

Bueno doesn’t charge until you are ready to export your tokens. Pricing is as follows:

0.00009 ETH per token

100 tokens is 0.009 ETH

1,000 tokens is 0.09 ETH

10,000 tokens is 0.9 ETH

### Pre-generated and 1/1 Token Collections

Pre-generated and 1/1 token collections follows the same pricing as our art generator to generate a tokenset.&#x20;

### Smart Contract Deployer

The deployer **is free to use,** you just pay gas to deploy. If you choose to sell your tokens, Bueno will take **5%** of primary sales, while secondary royalties are 100% controlled by you.&#x20;

If your mint price is free, Bueno takes nothing, as 5% of 0 is 0.&#x20;

### Drops

The Drops deployer **is also free to use,** you just pay gas to deploy. If you choose to sell your tokens, Bueno will take **5%** of primary sales, while secondary royalties are 100% controlled by you.&#x20;

</details>

<details>

<summary>Does Bueno support animation?</summary>

Yes! Check out our [tutorials](https://docs.bueno.art/v/generator/guides/advanced-tutorials/animation) on animation in Bueno for Photoshop and Figma. Additionally, Bueno supports GIF and APNG uploads directly into the generator.

</details>

<details>

<summary>What wallets can connect to Bueno?</summary>

You can connect to Bueno using Metamask, Rainbow, Coinbase, and WalletConnect supported wallets. Although you can choose to structure your metadata for Solana, Bueno is currently only compatible with Ethereum.

</details>

<details>

<summary>Does Bueno provide IPFS service?</summary>

Yes. Bueno offers an "Upload to IPFS" feature that will upload all of your token assets and metadata to IPFS. We have a one-click upload option powered by [NFTStorage](https://docs.bueno.art/v/generator/guides/creating-your-first-project/generation-and-export/upload-to-ipfs-with-nftstorage), as well as a [Piñata integration](https://docs.bueno.art/v/generator/guides/creating-your-first-project/generation-and-export/upload-to-ipfs-with-pinata).

</details>

## Bueno Generator

<details>

<summary>How do I upload assets to Bueno?</summary>

Before you begin, be sure you are familiar with how files must be organized in order to be properly uploaded into Bueno. To start your collection, you will need to upload the parent folder with subfolders of each of the traits in your collection. Here's an example of the file structure:

📁 Parent folder

\----- 📁 Attribute name

\-----------------PNGs/SVGs of each trait layer of this attribute

\-----📁Attribute name

\-----------------PNGs/SVGs of each trait layer of this attribute

We have detailed tutorials for organizing files with [Photoshop](https://docs.bueno.art/v/generator/guides/getting-started/preparing-your-assets/preparing-with-photoshop) and [Figma](https://docs.bueno.art/v/generator/guides/getting-started/preparing-your-assets/preparing-with-figma) to help you get started. 😀

Once you’ve properly organized your files, drag and drop or browse to choose your collection **parent folder.**

</details>

<details>

<summary>How do I prepare my assets with Procreate?</summary>

If you are using Procreate, export your assets to a PSD file, open it in Photoshop, and follow our [Photoshop prep guide](https://docs.bueno.art/v/generator/guides/getting-started/preparing-your-assets/preparing-with-photoshop).&#x20;

If you don't have Photoshop, ensure your assets follow the [correct folder hierarchy](https://docs.bueno.art/v/generator/guides/getting-started/preparing-your-assets) after exporting them. Otherwise, Bueno will not be able to properly upload the files.&#x20;

</details>

<details>

<summary>What files does the generator support?</summary>

Bueno currently supports SVG, PNG, JPEG, GIF and APNG formatted files.&#x20;

If the artwork output format is not selected in [artwork settings](https://docs.bueno.art/v/generator/guides/creating-your-first-project/navigating-the-bueno-generator/collection-pages#settings), the files will follow Bueno's default format settings. PNG input defaults to PNG output, SVG defaults to SVG, GIF defaults to GIF and JPEG defaults to PNG.&#x20;

If you create animated tokens by uploading frames into Bueno, they will export as GIFs, regardless of starting format.&#x20;

</details>

<details>

<summary>Can I upload a 1 of 1 collection into Bueno?</summary>

Yes! You can check out our tutorial [here](https://docs.bueno.art/v/generator/guides/creating-your-first-project/pre-generated-and-1-1-collections). &#x20;

</details>

<details>

<summary>Can Bueno create multiples of the same token?</summary>

Yes! You can use our [custom upload feature](https://docs.bueno.art/v/generator/guides/creating-your-first-project/pre-generated-and-1-1-collections) to upload multiples of the same token into the generator. You will need to make your own copies of the file before you upload them.&#x20;

If you need help creating many copies of your image(s), reach out to Bueno support by selecting the speech bubble in the bottom right while you're logged in to the app.&#x20;

Alternatively, you can check out our [Drops](https://docs.bueno.art/v/bueno-drops/introduction/overview) deployer! The Drops deployer utilizes the ERC-1155 standard which can be used to easily create multiple editions of a single artwork.&#x20;

</details>

<details>

<summary>How do I add collaborators to my project?</summary>

You can add collaborators in **project settings** - check out our [tutorial](https://docs.bueno.art/v/generator/guides/creating-your-first-project/navigating-the-bueno-generator/adding-a-collaborator)! To add collaborators, you’ll need their Ethereum wallet address.

</details>

<details>

<summary>How do I change layer order?</summary>

When Bueno uploads your assets, you may find that the layers are out of your preferred order. But don't worry - you can change layer order with our templates feature! To find templates, navigate to **Manage > Templates**.&#x20;

</details>

<details>

<summary>What happens if I don't have enough traits to create my token set?</summary>

If you do not have enough traits to satisfy your token set size, Bueno will let you know. Bueno will only create the maximum number of unique tokens if there are not enough traits. Bueno will not duplicate images to meet the number of tokens selected at the point of generation.

</details>

<details>

<summary>Why did my upload fail?</summary>

You will need to upload the parent folder with subfolders of each of the traits in your collection. Here's an example of the file structure:

📁 Parent folder

\------ 📁 Attribute name

\------------------PNGs/SVGs of each trait layer of this attribute

\------📁Attribute name

\------------------PNGs/SVGs of each trait layer of this attribute

For more detailed instructions, please refer to our [tutorials](https://docs.bueno.art/v/generator/guides/getting-started/preparing-your-assets) for prepping files for Bueno using Photoshop and Figma.

</details>

<details>

<summary>How does the "always pairs with" rule work?</summary>

The "always pairs with" rule ensures that multiple traits always appear together, and never separate. The rule can be used to group two or more traits, and if a trait has a “pairs with” rule, then it will never appear by itself.

### **How is this rule different to the “Only mixes with” rule?** <a href="#h_09ac9ad5c3" id="h_09ac9ad5c3"></a>

The "only mixes with" rule isn't as strict. It does not guarantee that two (or more) traits will **always** appear together as it only works left-to-right.

**Only mixes with:**

* **Blurple Color Background** will only appear with **Purple Body**
* **Purple Body** may appear with any other **Color Background**
* **Purple Body may appear without a Color Background**

**Always pairs with:**

* **Blurple Color Background** will only appear with **Purple Body**
* **Purple Body** will only appear with **Color Background**

### **How does the rule affect rarity?** <a href="#h_990f3c60a2" id="h_990f3c60a2"></a>

If a trait is paired to another then the chance of it getting picked is equal to the rarity of either traits getting picked. That's statistics at work! As a result, a trait that has a low rarity % (very rare) may become more common (less rare) if it has been paired with a trait of higher rarity.

However, if any of the traits has a fixed quantity, then paired traits will be limited to the lowest fixed value.

### **Help** <a href="#h_82e13bfc84" id="h_82e13bfc84"></a>

If your tokens are failing to generate or you notice rules aren’t behaving then we have some things you can do to help isolate the problem.

**Check your rules**

Use our rule analysis tool (**Manage** > **Rules** > **Analyze Rules**) to make sure you don’t have any conflicting rules. It’s very easy to create rules that conflict, but we try our best to find these for you.

You can also try removing rules one at a time to find which one is causing the generation to fail. You can always re-add it after.

**Traits and templates**

If you’re using fixed trait or template quantities, then make sure you have allocated enough traits. A template will not be used if it cannot satisfy “always pair with” rules.

Trait rarity also plays an important role. If your traits are too rare, or you have the overall attribute rarity set less than 100% it’s possible the generator will never pick your traits.

**Getting more help**

If you’re still stuck, please reach out to our support channel (<https://discord.gg/9BY2fS2D39>) with a link to your collection and a description of what’s going wrong.

</details>

<details>

<summary>What file type should I use for my collection?</summary>

Bueno supports SVG, PNG, JPEG, GIF and APNG, so it is up to you! For pixel art, please use PNG format for the best quality.&#x20;

</details>

<details>

<summary>What format will my files export as?</summary>

If you upload SVGs, Bueno will default export in an SVG format. You can change this by selecting the "export as PNG" toggle in artwork settings.&#x20;

PNG uploads will export as PNGs up to 2400x2400px (the full resolution files are saved as well, but we don't support downloading anything larger than that at this time).&#x20;

If you have multiple animation frames in either SVG or PNG format, those will export in GIF format.

GIF uploads will export as GIFs.&#x20;

</details>

<details>

<summary>What happens if I re-upload my parent folder with adjustments? </summary>

If you re-upload your parent folder, the old image files will be replaced in Bueno. If the trait names are the same and the images are different, Bueno will replace the image. If the image is the same, and the trait name is different, Bueno will rename the trait. Bueno will only add a new trait if the image and name are both new.

You can refer to the upload preview to see which images and/or names will be replaced or added with the new upload.&#x20;

</details>

<details>

<summary>Is it possible to generate 2 sets of images with the same traits?</summary>

Not yet, but it is on our roadmap!

</details>

<details>

<summary>How do I manage trait group rarity?</summary>

You can set the overall rarity of a trait group in **manage**. Select the three dots next to the trait group you’d like to edit.

Then, scroll down the pop-up window. There, you can set how often a trait group appears in your tokens.

</details>

<details>

<summary>What is metadata?</summary>

Along with your tokens, Bueno will also export your metadata to a JSON file. This file contains important data about each of your tokens, including its name, a description of its traits and its link to the hosted image.

The token name & description can be customized in the collection settings page.

You will need this metadata in order to deploy a smart contract and efficiently upload your tokens to a NFT marketplace.

</details>

<details>

<summary>Does Bueno support gradients for color styles? (Figma only)</summary>

We don't have support for gradients at this time. If you attempt to export color styles with gradients, the Bueno plugin will not export the .JSON file needed to create a color palette in the generator.&#x20;

</details>

<details>

<summary>What is IPFS? Do I need it?</summary>

IPFS (InterPlanetary File System) is a common method of storing NFT data. It can be better than storing an HTTP gateway URL since it's not tied to a specific gateway provider. HTTP gateways can break, and IPFS prevents that. Think of it as a decentralized cloud-like data-sharing system.&#x20;

IPFS also offers a way for you to set up a delayed reveal for your NFTs. Bueno will use a placeholder image, and you can switch to IPFS when you're ready to reveal. &#x20;

Bueno offers Piñata (paid subscription) and NFTStorage (free) integrations to easily pin your data to IPFS nodes.&#x20;

Uploading to IPFS is not required, and Bueno will host your NFT data reliably, for no additional cost.

</details>

<details>

<summary>How do I upload to IPFS?</summary>

Yes. Bueno offers an "Upload to IPFS" feature that will upload all of your token assets and metadata to IPFS. We have a one-click upload option powered by [NFTStorage](https://docs.bueno.art/v/generator/guides/creating-your-first-project/generation-and-export/upload-to-ipfs-with-nftstorage), as well as a [Piñata integration](https://docs.bueno.art/v/generator/guides/creating-your-first-project/generation-and-export/upload-to-ipfs-with-pinata).

</details>

<details>

<summary>How do I remove files from IPFS?</summary>

Once you've uploaded files to IPFS, they can be unpinned but they cannot be "deleted". This is because IPFS is decentralized, and once a file is on the network, it will be replicated & persisted by other IPFS participants.&#x20;

In Piñata, you can "unpin" your tokens. This is useful if you no longer want files to count towards your Piñata usage, but as mentioned above, it will not permanently remove your files from the network.

</details>

<details>

<summary>Does it cost anything to upload to IPFS?</summary>

If you use our [NFTStorage Integration](https://docs.bueno.art/v/generator/guides/creating-your-first-project/generation-and-export/upload-to-ipfs-with-nftstorage), you will not be charged anything for uploading your files. If you use our [Piñata integration](https://docs.bueno.art/v/generator/guides/creating-your-first-project/generation-and-export/upload-to-ipfs-with-pinata), you might need to upgrade your account as the free tier has restrictions. &#x20;

</details>

<details>

<summary>Do I have to upload to IPFS again after I regenerate the token set metadata?</summary>

Yes - if you regenerate your metadata, IPFS will still have your old metadata hosted.&#x20;

</details>

<details>

<summary>Can I delete the Bueno API key from Piñata after an upload?</summary>

Yes. The API key is only used once so you can revoke it through Piñata.

</details>

<details>

<summary>My IPFS upload failed, what can I do?</summary>

If Bueno is unable to pin your tokens to IPFS, we try and provide some messages as to why, and give you the option to retry the upload.

If you chose Piñata as your IPFS storage solution, check your [Piñata account usage](https://app.pinata.cloud/billing). You may need to upgrade your account to get more storage.&#x20;

If you used NFTStorage, please get in touch with support.

</details>

<details>

<summary>I want to modify my token set, but I already paid for a generation. Do I have to pay again to regenerate? </summary>

Yes. However, if the changes are small, our support team will be able to assist free of charge.&#x20;

</details>

<details>

<summary>Why do my GIFs look so low-quality / bad? </summary>

GIF is a limited file format that only supports 256 colors. Because of this, higher-quality animation frames, especially images with detailed shading, will not be rendered well in a GIF. These limitations can cause artifacts in your images among other issues.

\
If you are unhappy with the quality of your GIFs, we suggest trying the APNG format which Bueno also supports. &#x20;

</details>

<details>

<summary>What is a token external URL? Do I need it?</summary>

This is an **optional** field for people who would like to allow users to view token on their website.&#x20;

</details>

<details>

<summary>Do I need a custom IPFS gateway prefix?</summary>

The custom IPFS gateway field is for people who already have a custom IPFS gateway. If you don't have one, you don't need to fill this out. It is **optional**.&#x20;

</details>

<details>

<summary>Can I reserve specific tokens for airdrops? </summary>

This is possible with Bueno's hidden pinning feature. The best method is to pin the tokens at the top of your collection and airdrop them **first** before you open your sale. Airdrops drop tokens in regular minting order.&#x20;

To prevent pinning abuse, the feature is hidden. Please request the feature by opening a support ticket in the Bueno Discord channel.&#x20;

</details>

## Smart Contract Deployer

<details>

<summary>I don't need to use the generator - can I still use the contract deployer?</summary>

Yes! As long as you have your image files and metadata, you can use the Bueno Contract Deployer. You can learn more about importing your pre-generated artwork into Bueno [here](https://docs.bueno.art/v/generator/guides/creating-your-first-project/pre-generated-and-1-1-collections). &#x20;

Due to a recent change in policy, pre-generated collections are no longer eligible for a free token set generation. We are working on additional pricing options to make this process more accessible & safe for everyone.&#x20;

</details>

<details>

<summary>Why can't I see my artwork on the Testnet?</summary>

To keep your metadata protected, your contract is deployed with "Metadata Protection" turned on.

You can turn this off in your contract management dashboard, and your real tokens will appear on the testnet when minted.

</details>

<details>

<summary>How do I upload my collection to OpenSea after mint?</summary>

Once you've deployed your smart contract, the tokens will automatically show up on Opensea as they are minted. You can manage your Opensea collection settings by logging in with the wallet used to launch the smart contract.&#x20;

For more information on customizing your collection page on Opensea, you can check out their tutorial, [here](https://docs.opensea.io/docs/7-customizing-your-storefront).&#x20;

</details>

<details>

<summary>How come the banner / text / logo I uploaded to Bueno don't appear on OpenSea?</summary>

Bueno & OpenSea are two separate platforms. OpenSea will create a collection page for your smart contract automatically once they have detected a token was minted, but we aren't able to automatically customize your storefront.&#x20;

**You can customize the logo, banner, name, etc directly on OpenSea.** Check out their tutorial, [here](https://docs.opensea.io/docs/7-customizing-your-storefront).&#x20;

</details>

<details>

<summary>How do I create different sale phases?</summary>

There are two main sale periods - pre-sale and public sale. With the Bueno deployer, you can set up **multiple sale phases during your pre-sale period to run at the same time**. This way, you can attach several allowlists with various settings.\
\
Learn more by visiting our sale phase tutorial, [here](https://docs.bueno.art/v/smart-contract-deployer/contract-creation/step-2-pricing-and-sale-phases#pre-sale-minting-phases).&#x20;

</details>

<details>

<summary>Can I make changes after I deploy my smart contract?</summary>

After your smart contract is deployed, you can still edit tokens and metadata. However, once minting has started, Bueno cannot make changes to your token set without the minted tokens changing as well.&#x20;

You can pause your sale at any time after you've deployed your smart contract.

Before and during mint, you can make changes to your allowlists, prices, sale phases and per wallet minting limits.&#x20;

</details>

<details>

<summary>Can you mint directly from contract?</summary>

People can mint directly from the contract via Etherscan as long as you don't have an allowlist associated with the minting phase. Allow lists prevent access to data needed to mint from contract.

</details>

<details>

<summary>How does delayed reveal work?</summary>

With the delayed reveal, your token metadata will be the placeholder image that you uploaded when deploying your contract until you switch to "reveal" in your contract management page.&#x20;

In order to view changes in marketplaces such as Opensea, make sure your holders hit "refresh metadata."&#x20;

</details>

<details>

<summary>Is the minting page also included with the deployer?</summary>

Yes! Bueno provides fully hosted mint pages.

</details>

<details>

<summary>Will the minting widget work on my website? </summary>

The Bueno minting widget can be embedded in most website builders including Webflow, Squarespace and Wix.&#x20;

**Note:** You may need to update your website builder subscription package in order to embed custom javascript code.&#x20;

</details>

<details>

<summary>Can I deploy my contract from a collaborator wallet?</summary>

Yes! Collaborators have all the same permissions as the primary project owner.&#x20;

**Note:** Once a contract is deployed, it can only be managed with the wallet it was deployed from.&#x20;

</details>

<details>

<summary>What's the difference between a global max per wallet, and a phase max per wallet?</summary>

These maximums help control your minting flow, and you can set each one individually. They are similar but have key differences.&#x20;

The **global per-wallet maximum** will enforce a max amount of tokens across all phases (including your public sale, if you have one). The Bueno contract will ensure that the user cannot mint more than that amount of tokens **cumulatively**.

The **phase per-wallet maximum** enforces a max amount of tokens to be minted in that particular phase. This restriction **is not cumulative**, which means the rule is only active for the particular phase that it is set on. Mints from other phases do not count toward this.

In cases where the global max is set lower than the phase max, the global max will override the phase max.&#x20;

</details>

<details>

<summary>How do I set royalties? What about Opensea royalties?</summary>

Bueno uses **EIP-2981,** allowing you to put your desired royalty percentage & payout address directly onto your smart contract. It is up to the marketplace to decide whether or not they will honor these set creator royalties.

For OpenSea royalties, you must set them up from your Opensea collection settings. Opensea no longer enforces royalties, so creator fees will act as a suggestion for traders that buy art from your collection.&#x20;

</details>

<details>

<summary>Is the Bueno smart contract audited?</summary>

Yes -- the Bueno contract deployer & minting contract were audited by 0xMacro. You can read the full report [here](https://0xmacro.com/library/audits/bueno-art-1.html).

</details>

<details>

<summary>How do I use a multi-sig wallet?</summary>

A mult-sig wallet functions almost exactly the same as an individually owned wallet. This means that you can use a multi-sig wallet just as you would any other wallet while using Bueno. The main difference is that to initiate a transaction with the wallet, all designated signers must sign to complete that transaction.&#x20;

Since only one wallet address can collect royalties at a time, a multi-sig wallet is needed if you want to securely split royalties between 2 or more people.&#x20;

</details>

<details>

<summary>I noticed a mistake in my artwork/metadata after mint. Can I update my tokens?</summary>

Options to update mistakes after mint are possible, but limited. Reach out to Bueno support to go over your options. From IPFS re-uploads, to manual metadata editing, we will do our best to help you every step of the way!

</details>

## Drops

<details>

<summary>How many images can I upload into a Drop?</summary>

Bueno lets you add images to a drop in batches of 100 maximum, but you can continue to add as many as you'd like.&#x20;

Keep in mind, Drops contracts are optimized for smaller, editions-based collections, and we do not recommend Drops for collections with more than 100 unique art pieces.&#x20;

Additionally, unlike the Generative smart contract, gas prices for Drops deployment scales with the number of unique images you plan to drop.&#x20;

</details>

<details>

<summary>Can I add new tokens to my contract after deployment?</summary>

Yes! You can add a new token images to your deployed Drops contract at anytime. Keep in mind, each additional artwork will cost gas to drop with your contract.&#x20;

</details>

<details>

<summary>Can I change my token images, metadata or mint setting after deploying?</summary>

Yes, but only up until the first edition of a token is minted. Once minting has started, those settings are all locked in and cannot be changed in Bueno.&#x20;

</details>

## Buenoverse

<details>

<summary>How can I access the Buenoverse?</summary>

You can create a Buenoverse world directly from your project dashboard! Check out our tutorial, [here](https://docs.bueno.art/v/buenoverse/getting-started/creating-your-first-world).&#x20;

</details>

<details>

<summary>Are there building kits available?</summary>

Yes! You can access building kits from the [**Asset Manager**](https://docs.bueno.art/v/buenoverse/fundamentals/asset-manager).

</details>

<details>

<summary>What networks does the Buenoverse support?</summary>

Buenoverse currently supports NFTs on the Ethereum and Polygon networks.&#x20;

</details>

<details>

<summary>How do I increase the size of my world?</summary>

You can increase the boundaries of your world by navigating to room settings, and increasing the % of your width and height.

</details>

<details>

<summary>How do I add a new room to my world?</summary>

You can add a new room from your project dashboard or by navigating to [settings](https://docs.bueno.art/v/buenoverse/fundamentals/worlds-and-rooms#settings) while building in your Buenoverse.&#x20;

</details>

<details>

<summary>What resolution should I work with?</summary>

The Buenoverse looks best with images formatted for standard display resolution, 1920 x 1080px.&#x20;

</details>


# Introduction

Bueno takes platform safety very seriously. We're continuing to roll out features to protect both sellers and buyers. **Bueno Verification** is a way we're tackling this challenge.&#x20;

There are a couple of different types of verification. Click the one you're interested in learning more about below.

### :open\_file\_folder: Project Verification

* [Social Proof](/verification/project-verification/social-proof)
* ... coming soon

### :adult: Profile Verification

* [Social Proof](/verification/profile-verification/social-proof)
* ... coming soon

{% hint style="info" %}
Additional verification types are coming soon.
{% endhint %}

Keep in mind that without using any form of verification, users will be presented with the following message when minting:

<figure><img src="/files/GBfcvh3FmpdAVZhlQl1O" alt="" width="375"><figcaption><p>Warning message shown to minters of unverified projects</p></figcaption></figure>


# For Collectors

Learn more about the different types of Bueno verification

Bueno offers a couple of ways for creators to share pertinent information (such as social media links) with collectors (you!). As someone buying into a digital collectible project, you probably want to also find the most accurate information about who the creator is! Below is more information about the different types of verification & badges.

{% hint style="warning" %}
**A project can verify their social links but it doesn't mean the project is a good investment or endorsed by Bueno. Please remember to research a project before purchasing.**
{% endhint %}

### Social Proof <img src="/files/yyXjUW5Tjb0EOMOyhpdd" alt="" data-size="line">

Social Proof verification is a way for a project or artist to share their project or personal social links. A project that has added verified social links will have a badge along with the verified links contained inside.&#x20;

To receive this badge, users are required to authenticate into Bueno with their Twitter or Discord accounts. When verifying a Project's Discord, the creator is only able to select a server that they manage.

When you see the Shield for a project or artist, you can click on it to view the verified account(s).

<div><figure><img src="/files/zI424JuIApewV6K1oRnJ" alt=""><figcaption><p>Example of Profile verification</p></figcaption></figure> <figure><img src="/files/QNKVdFcmi79JkdvrpHV7" alt=""><figcaption><p>Example of Project verification</p></figcaption></figure></div>

{% hint style="info" %}
Additional verification types are coming soon.
{% endhint %}


# Social Proof

Social Proof verification gives a way for your collectors to find your verified social media accounts.

To verify social links for your Bueno project, start by navigating to your project settings by selecting the cog symbol in the upper right of your project dashboar&#x64;**.**

<figure><img src="/files/mrcLfSMNUWPVaMbSb7XW" alt=""><figcaption></figcaption></figure>

From here, click the "Verification" tab. This is where you can link your Twitter or Discord server *(additional integrations are coming soon).*&#x20;

<figure><img src="/files/Hbb1cFHQRRNhmX8UpFvJ" alt=""><figcaption></figcaption></figure>

Once you've attached one or more social accounts to your project, anywhere that your project is displayed on the Bueno application, your users will be able to view your verified accounts.

<figure><img src="/files/ECxDZh93fiomxnIY1E4v" alt="" width="563"><figcaption></figcaption></figure>


# Social Proof

Social Proof verification gives a way for your collectors to find your verified social media accounts.

To verify social links for your Bueno profile, start by selecting your portrait in the top right and click on **Profile**.

<figure><img src="/files/l6wzghAJuPNQhvX7pw1W" alt=""><figcaption></figcaption></figure>

From here, click the "Verification" tab. This is where you can link your Twitter or Discord server *(additional integrations are coming soon).*&#x20;

<figure><img src="/files/gBZueix2ABsQ0uXUwzj8" alt=""><figcaption></figcaption></figure>

Once you've attached one or more social accounts to your project, anywhere that your Profile is displayed on the Bueno application, your users will be able to view your verified accounts.

<figure><img src="/files/sv4ZfprlegPfV7nlQMrE" alt=""><figcaption></figcaption></figure>


# Overview

Collect data the Web3 way.

{% hint style="info" %}
**Note:** Bueno Forms are currently undergoing active development, and as such, features are subject to change and certain documentation may be incomplete.
{% endhint %}

The Bueno Forms feature gives creators an easy way to collect wallet addresses for Web3 projects. From mint allowlists to raffles and event lists, forms can be used to provide utility to your projects and give you peace of mind when you're ready to start your mint.&#x20;

In this tutorial, we'll walk you through all the features that Bueno Forms offer. Let's get started!


# Getting Started

We'll show you how to create your first form.

In your project dashboard, select **Create** and then select **Form**. Once you create your form, it will be available in your project dashboard.&#x20;

<figure><img src="/files/Qm4l4zaprzINV0CZgPxR" alt=""><figcaption></figcaption></figure>

A pop-up window will appear. You can do a quick start with one of our templates, or create a form from scratch. To begin customizing the form, select **Continue**.&#x20;

<figure><img src="/files/T1M2Imwe0uJJ6LLwh1Mg" alt=""><figcaption></figcaption></figure>

{% hint style="info" %}
Your project can have multiple active forms. If you are planning to create several allowlists for your collection, make sure you name your allowlists distinctly to avoid any confusion! &#x20;
{% endhint %}

Super easy, right? Next, we'll walk you through each step of the setup and customization process.&#x20;


# Information and Settings

Add form information and customize general settings.

You can customize important details about your form, including the name, end date, maximum allow list spots and info for social media. For most customizable items, you can click directly on the form page to edit sections directly.&#x20;

## Form Settings

For form settings, navigate to the Settings tab in the menu bar.&#x20;

<figure><img src="/files/91yTSsxJ8ArH1oazC2Ow" alt=""><figcaption></figcaption></figure>

### General

In general settings, you can edit form profile image, name and submission settings. By default, Bueno forms will not allow double entries unless the multiple submissions option is toggled on.&#x20;

<figure><img src="/files/Re5uPxbyR6sI0NaTnzqg" alt=""><figcaption></figcaption></figure>

### Security

In security settings, you can gate your form with a password and implement a Captcha requirement.&#x20;

<figure><img src="/files/0TETmb99pcYaYou9DfqF" alt=""><figcaption></figcaption></figure>

### Integrations

Here, you can create an integration secret code to connect the form directly to your Discord server. For more information about setting up integrations, go [here](/bueno-forms/integrations/discord).&#x20;

<figure><img src="/files/TgCC0EC0ZFIOt04gF66J" alt=""><figcaption></figcaption></figure>

## Page Settings

You can get to page settings by selecting the cog in the upper right of your form. Under page settings, you can set your form title and create a brief description for the form webpage. You can also choose an accent color.&#x20;

<figure><img src="/files/5nbELu8MXBe9GQD5UerV" alt=""><figcaption></figcaption></figure>

Confirmation settings will let you customize a confirmation message to display after a user has signed up for your form.

<figure><img src="/files/tpe5hebF4JcKwe9mzMm6" alt=""><figcaption></figcaption></figure>

## Form Header

You can customize the form header by clicking directly on the elements. The information in the header includes form banner image, form thumbnail, form name, project social media links as well as form end date and max entries.&#x20;

<figure><img src="/files/yjJeJ121YxanKfRCi5Tr" alt=""><figcaption></figcaption></figure>

A Bueno form will not allow the same wallet to sign up for a list more than once unless , so no need to worry about multiple entries counting towards your spot maximum.


# Validations

Bueno Forms offers several different options to gate allowlist entries. From the form widget on the right side of the page, you can select the validation parameters. Bueno currently supports validations for wallet and Discord.

Add a validation by selecting the plus symbol. To edit the validations, click directly on those selections in the form widget.

<figure><img src="/files/TtghmAVSnNlFiEQUonCX" alt=""><figcaption></figcaption></figure>

### Wallet Validations

<figure><img src="/files/MeGE7E0cecF6xOihrWMw" alt=""><figcaption></figcaption></figure>

#### Balance

Balance requirements are useful for collecting wallets for mint allowlists. This will ensure that everyone on your list has enough ETH to actually mint your NFT on your mint day, and prevents limited spots from being taken up by wallets unable to mint.&#x20;

#### NFT Requirements

Yes, Bueno Forms offers token gating! This is a great way to offer utility to a previous project or build partnerships with other NFT communities by granting exclusive access to holders of a particular collection. You can select multiple collections, and users signing up must have **at least one NFT from at least one of the listed collections**.

#### Discord Role

<figure><img src="/files/MuqqIrkQJrJOlpWwdw1j" alt=""><figcaption></figcaption></figure>

Does your Discord have roles for multiple or cross-community holders? What about roles to reward active community engagement? Discord role requirements are another way to offer exclusivity to these smaller groups within your community or partnered communities.&#x20;

Additionally, Bueno Forms also has Discord integration to seamlessly share forms in your server. For more information, check out [this tutorial](/bueno-forms/integrations/discord).&#x20;


# Elements

**Elements** settings let you customize your form even more with additional fields.&#x20;

To add a new element, select the plus symbol next to **Elements** directly in the form widget, and choose one of the available options.

<figure><img src="/files/BSKkI3t1gnGo8StWOFZO" alt=""><figcaption></figcaption></figure>

Once added, a pop-up will appear for you to customize your elements to your needs. You can make these fields optional or required.&#x20;

{% hint style="danger" %}
Note: Bueno **does not** verify element information.&#x20;
{% endhint %}

## Elements Available

Elements can be used to collect additional data about your users. As we expand Bueno Forms, this list may update periodically. We'll go over each element and show you how they can be applied to your form.

### Text and Number

Use this element to collect data about your users, including items such as name, address or phone number. These fields are helpful for generating lists for sending swag or text alerts. You can also ask open-ended questions to discover more about your users.&#x20;

### Email&#x20;

Email requirements can be set in order to vet submissions or collect contact information to send important updates and/or marketing emails.&#x20;

### Checkboxes and Selections&#x20;

Checkboxes and selections can be used for closed-ended yes or no questions or multiple-choice selections. Use these to gather additional data about your users within your required parameters. &#x20;


# Form Page

Once you're done customizing your form, it's time to share with your community! With the form page, you can create a customized Bueno URL to share.&#x20;

You can customize the URL and publish your form page by selecting the **Share** button in the top right.

<figure><img src="/files/mqJxKXjwdi6BR4pdK779" alt=""><figcaption></figcaption></figure>


# Form Embed

You can choose to share your form with your customized [Bueno Form Page](/bueno-forms/creating-a-form/form-page) link, or embed the form directly on your website.

To access the embed code for the Javascript **Form Widget**, navigate to **Share** from your form's page editor, and select **Embed**.&#x20;

<figure><img src="/files/ggDXbkWxBOMCnmSdDEuF" alt=""><figcaption></figcaption></figure>

The embed will work with most popular website builders, however, you may need to upgrade your web builder plan to support Javascript code on your site.


# Responses

You can review and download all of your form responses directly from the response menu. If you've set any elements, that information will also be recorded here.

<figure><img src="/files/dxJdi26p2HJNejJf6lO6" alt=""><figcaption></figcaption></figure>

If you need to manually input a response, you have that option here as well. Just select **Add Response** on the upper right to bring up the input pop-up.

<figure><img src="/files/CL8NmrkInhJ2clyjIrjv" alt=""><figcaption></figcaption></figure>


# Exports

The Exports page keeps a snapshot record of your form response exports.

<figure><img src="/files/R1swbnEU0k2LQr0g4tEH" alt=""><figcaption></figcaption></figure>

To create a new export of your responses, select **New Export.** In the pop-up window, you can name your export and set snapshot parameters.&#x20;

<figure><img src="/files/6KEZl53CXHgOcB8GBXDR" alt=""><figcaption></figcaption></figure>

You can use these exports to integrate directly into your Bueno smart contract, or download as a CSV for use outside of the Bueno app. &#x20;


# Discord

You can accept form submissions from Discord, without requiring your users to visit any external websites.&#x20;

To start, please make sure you've already created a form within Bueno.

**Integration Steps:**

* Invite the Bueno Discord bot into your server with the correct permissions. [Click here](https://discord.com/oauth2/authorize?client_id=942918810120388618\&scope=applications.commands) to invite the Bueno bot.
* In form settings, scroll down to **Integrations** at the bottom of the page.&#x20;
* Grab your `Form ID` and `Form Secret`. Refer to the image below to identify these two pieces of information

![This is where you can find your Form Secret & Form ID](/files/sw7l6x3yl1KonSa6QXAi)

* In Discord, navigate to the channel where you'd like to collect form responses, and type `/form-connect` and you will be prompted to provide your `Form ID` & `Form Secret`. Use the values you collected above.

{% hint style="info" %}
**Note:** If you receive an error when attempting to connect your form and retrying does not help, please contact our support team.
{% endhint %}

* If this was successful, the bot will reply back with a success message.

![Success message from /connect](/files/q5OH95uIDZSoNgRAQaU2)

* Your users will now be able to use the `/form-register` command to sign up for your form.  See below for an example of what that might look like.

![GIF of the user registration process](/files/43EsvlDNZjqWN59SM1M7)

{% hint style="info" %}
**Note:** To protect user privacy, form responses are not shown in the channel, but you will be able to see them in the **Responses** tab of Bueno.
{% endhint %}


# Microverse

**WIP**


# Allowlists

Connect your allowlist to your contract directly in Bueno.

Pre-sale allowlists are encouraged to prevent bots from compromising your mint and hoarding your supply. Allowlists for mints can also be a great way to reward your community or provide utility for other projects by granting exclusive access. Below, we'll show you how easy it is to integrate Bueno Forms into your smart contract!

### Using Forms with Bueno Smart Contract

If you’re using Bueno Forms to create an allowlist for your Bueno smart contract, you can select it directly from the contract settings before you deploy. From **Token Pricing**, scroll down and enable **Pre-Sale Allowlis**t. Then, navigate to **Select an Allowlist**, and find your list from the options below.

<figure><img src="/files/5yErYz9DI5VkdCmBHaCk" alt=""><figcaption></figcaption></figure>

You can pause and change your allowlist at any time after your contract has been deployed. However, you **must deploy with an allowlist** in order to add or change one after deployment.

Allowlist changes can be made by navigating to the contract’s **Management** page and scrolling down to **Pre-Sale Details**. Select your allowlist to bring up the allowlist management window. Click your new allowlist and pay gas to sync with your contract!

<figure><img src="/files/B0kbZPiLcWhPFv7fkGKU" alt=""><figcaption></figcaption></figure>

{% hint style="warning" %}
Any changes to a current allowlist will also require gas to sync.
{% endhint %}

You can learn more about adding allowlists in our contract deployer [tutorial](https://docs.bueno.art/v/smart-contract-deployer/allowlists/allowlists-introduction).&#x20;


# Raffles

**WIP**


# Event Signups

**WIP**


# Treasure Hunts

**WIP**


# Welcome to the Buenoverse! 🌍

Just dream it and build it!

Think of a place, any place! A castle in the clouds, a mysterious jungle or even a peaceful little town. **With Buenoverse, creating any of these from scratch is a breeze!**

## **Dream 💭**

If you can dream it, you can build it! Buenoverse lets anyone create games and worlds with friends in real time — all from your browser. Get inspired with our Bueno asset kits, or import your own artwork.&#x20;

### *Use AI to bring your dreams to life!* 🌱

Our [AI image generator](/buenoverse/fundamentals/image-generator) can turn your sketches into a vibrant playground in seconds. Plus, you can add dynamic characters that tell stories thanks to our [AI-powered dialog generator](/buenoverse/interactions/dialogue).

## **Build 🛠️**

With our [builder tools](/buenoverse/getting-started/builder-basics), players can add elements to create immersive, interactive experiences and games.

Real-time collaboration allows players to witness others’ creations and collaborate simultaneously. Toggle between player and builder modes, so you can build with friends while you play!

## Connect 🤝

Buenoverse is not just a tool, it's a community — a place where everyone can come together to share, inspire, and marvel at each other's worlds.

Communities can host different events in their worlds, such as art exhibitions, music events, audio chats and live audio broadcasts, treasure hunts, contests and more. The only limit is your imagination!

### *Welcome to Web3 🚀*

As a Web3 tool, players can explore the Buenoverse as their digital collectables. The best part? Builders can use Web3 verification mechanics to create special experiences for their collectors.

{% hint style="success" %}
Check out our community-driven [roadmap](https://themicroverse.art/roadmap) to keep up to date with new features and request features you'd like to see. Let's build together! 🤝
{% endhint %}

## Eager to jump right in? Check out our Buenoverse video tutorial playlist!

{% embed url="<https://www.youtube.com/playlist?list=PLbG4lDfPqmZuqSWQTvQ6IbcIGDpkZGt1a>" %}


# Buenoverse Plans

All Bueno accounts will start out with the Buenoverse free plan, so you can start building and growing your community right away.&#x20;

Payment plans are available to scale with you as your world grows! Plan perks include:

* Unlimited world projects and rooms.
* Added AI generation credits.
* Additional builder and moderator permission seats.&#x20;
* More players at a time.

### Check out the grid below to see what is included with the free plan

<table><thead><tr><th>Plan</th><th>Starter (Free)</th><th>Premium (Starting at $8/month)</th><th>Deluxe (Starting at $12/month)</th><th data-hidden>Premium</th><th data-hidden>Deluxe</th></tr></thead><tbody><tr><td> <strong># of</strong> <strong>Projects</strong></td><td>1</td><td></td><td></td><td>Unlimited</td><td>Unlimited</td></tr><tr><td> <strong>#</strong> <strong>of Rooms</strong></td><td>5</td><td>Unlimited</td><td>Unlimited</td><td>Unlimited</td><td>Unlimited</td></tr><tr><td><strong>AI Generations (Per Project)</strong></td><td>20 images per month</td><td>200 images per month</td><td>Unlimited</td><td>200 images per month; 10,000 interactions per month</td><td>Unlimited</td></tr><tr><td><strong>Guest Builders (Per Room)</strong></td><td>2</td><td>10</td><td>Unlimited</td><td>10</td><td>Unlimited</td></tr><tr><td><strong>Room Level Moderators (Per Project)</strong></td><td>2</td><td>10</td><td>Unlimited</td><td>10</td><td>Unlimited</td></tr><tr><td><strong>Players (Per Room)</strong></td><td>25</td><td>100</td><td>Unlimited</td><td>100</td><td>Unlimited</td></tr></tbody></table>


# Creating Your First World

Begin building your world in only a few clicks! It's free to get started. Let's walk through the steps.&#x20;

First, create a [Bueno account](https://docs.bueno.art/creating-a-bueno-account). If you don't have a crypto wallet, you can create a Magic wallet with your email address.&#x20;

Next, give your project a name and a URL in settings. This URL will be your share link so players can join your world.

Finally, select **+ Create** and navigate to **Buenoverse**.

You can get started with a blank room, or use a Buenoverse template room.&#x20;


# Builder Basics

Builders can freely modify the world in real time. They can add objects, interactions and portals to create interactive experiences. We'll show you how!

{% embed url="<https://www.youtube.com/playlist?list=PLbG4lDfPqmZuqSWQTvQ6IbcIGDpkZGt1a>" %}

## Enter Build Mode

To enter build mode, you'll first need to connect with your Bueno account wallet. You can sign in with your wallet by selecting the **Login** button at the top right, or navigate to the room via your project dashboard in Bueno.

<figure><img src="/files/cYz2EP5d7T07qheT0W05" alt=""><figcaption></figcaption></figure>

After connecting, if you have access to build in the room you will see a button in the top center that can toggle on **build mode**. Click this button to bring up your builder toolbar. Now you can start building!

<div><figure><img src="/files/EUb7BurVNietXoT28Nlv" alt=""><figcaption></figcaption></figure> <figure><img src="/files/jKfumFTgLVsm6Dl7WxkF" alt=""><figcaption></figcaption></figure></div>

## Free Scroll Mode

Free scroll mode lets you navigate around your room without walking your character. This is useful when constructing very large rooms. You can turn on free scroll mode by navigating to the properties panel underneath your name in the top right, and selecting the icon with four arrows.&#x20;

<figure><img src="/files/ckonmS3ZEOfo8aqzSfUn" alt=""><figcaption><p>Free scroll selection.</p></figcaption></figure>

## Grid Settings

Grid settings can help you build more precisely! You can activate grid mode in the properties panel.

<figure><img src="/files/4g2tF6IO7V5gPHl6qLG1" alt=""><figcaption></figcaption></figure>

Here, you can also enable **snap to grid** mode. This will auto-snap your objects and backgrounds to sit along the grid for quick, precise placement.&#x20;

<figure><img src="/files/FLm9eM6hHoP3j5f1od3R" alt=""><figcaption></figcaption></figure>


# Add Collaborators

Buenoverse is all about community and collaboration! To add a new builder to your world, simply select your world name in the top left and navigate to **Settings >** **Permission Groups.**

<figure><img src="/files/kbbFVLWcnLvi5pzPtMZS" alt=""><figcaption><p>Permission groups under Buenoverse settings.</p></figcaption></figure>

Select **Builders**, and enter the wallet address of the builder you would like to add under **Group Members.**

<div><figure><img src="/files/wW2xG1OlsZ3r1eU6YUl6" alt="" width="563"><figcaption><p>Permission groups window.</p></figcaption></figure> <figure><img src="/files/iuY8AJt6HAmPPDBMc8Hp" alt="" width="375"><figcaption><p>Edit permission group window.</p></figcaption></figure></div>


# Worlds and Rooms

Before we go into building fundamentals, let's start by going through the basic structure of Buenoverse - worlds and rooms.   &#x20;

## Worlds and Rooms

Your world in Buenoverse is your first "home" room, and it will house any additional rooms that you create. The world URL is based on your Bueno project slug, so you can have **one world per project** in Bueno.

The URL of your world will show the world name, followed by the room name:

```
https://verse.bueno.art/[world]/[room]
```

If you have [token-gated](/buenoverse/player-management/token-gating) a room and a player without access tries to join, it will send the player to your "home world" room.&#x20;

If the home world is also token-gated, Bueno will direct the player to the Buenoverse homepage. We recommend leaving your home world room public!&#x20;

## Settings

In the upper left menu, builders can edit settings for their world and room.&#x20;

<figure><img src="/files/3NBQt6ejrnwlQcyhap6i" alt=""><figcaption></figcaption></figure>

The room settings only apply to the current room. The world settings apply to all the rooms under your world's URL.

### Room Property Settings

In the Room Properties menu, builders can select basic room settings including:

* Room name
* Background color
* Room size
* Grid size
* Pixel size
* Player avatar size
* Room thumbnail image

<div><figure><img src="/files/AgjmZHZb0bbQ1ASDZKst" alt=""><figcaption></figcaption></figure> <figure><img src="/files/vTp4AnBhX0cJSTbStS5a" alt=""><figcaption></figcaption></figure></div>

You can also use room properties settings to convert your room to a world. If enabled, this room will **not** inherit properties from the parent world, such as [sounds](/buenoverse/fundamentals/sounds), [XP](/buenoverse/player-management/xp-and-level-up), [health](/buenoverse/player-management/player-health), etc., **but will have its own.**

{% hint style="success" %}
Use the **Is World** setting when you want to create an isolated world inside another world for something like a mini-game.
{% endhint %}

Additionally, you can use room property settings to apply world status to child rooms. If enabled, it automatically turns each direct child room into a separate world, with separate world settings.&#x20;

```
https://verse.bueno.art/[world]/[room]/[child]
```

#### Night and Snow Modes

Night mode makes the room completely dark. The player uses a fixed light source or flashlight to navigate the darkness. Use this setting for a spooky atmosphere.&#x20;

<figure><img src="/files/2BzyJCLXuP5GHMkOgJj0" alt=""><figcaption></figcaption></figure>

Snow mode turns on animated snow flakes. It's perfect for creating something special for the winter season!

<figure><img src="/files/4TBsqz1tbjJHW0QpjlVe" alt=""><figcaption></figcaption></figure>

### World settings

In the **World Settings** section, builders can:

* Connect Discord integration
* [Customize experience points level system](/buenoverse/player-management/xp-and-level-up)
* [Edit sound settings](/buenoverse/interactions/effects/sounds)
* [Set player health points](/buenoverse/interactions/abilities/health)

For more information on each of those settings, continue to the [interactions](/buenoverse/interactions/introduction-to-interactions) section of the support docs.&#x20;


# Player Spawn Points

Spawn points are the places that players will appear when they join a room.&#x20;

{% hint style="info" %}
Later, you can set up element spawn points for more complex element interactions. Learn more about that [here](/buenoverse/interactions/introduction-to-interactions)!
{% endhint %}

Each room has a default spawn point where a player will first appear when joining for the first time. Rooms can also have additional spawn points which can be linked to via [portals](/buenoverse/interactions/portals).&#x20;

To add a spawn point, go to the object menu and find **Player Spawn**.

<figure><img src="/files/76aYEAjogvYSoRli5iVo" alt=""><figcaption></figcaption></figure>

This will prompt you to click where you would like to place the spawn point. Selecting the spawn point will bring up the player spawn tool bar.&#x20;

<figure><img src="/files/Qb95PZ4hY5OLKNuzCkBq" alt=""><figcaption></figcaption></figure>

Once you make a spawn point, you can also select what floor the spawn point will place players. This is useful when making [portals](/buenoverse/interactions/portals) to multi-level rooms.&#x20;

<figure><img src="/files/bmqCOtcWFghKvjvt3AR5" alt=""><figcaption></figcaption></figure>

To make the spawn point the default point when new players join your world, simply select the sign post icon in the tool bar. The icon will turn blue if selected.&#x20;

<figure><img src="/files/9Hv3mKZryY9G5CoBMzg7" alt=""><figcaption></figcaption></figure>

You can use the permissions editor to grant or block access to specified wallets or wallet groups in your Bueno Worlds address book. Add an optional message to inform outside users why they aren't able to join!&#x20;

<figure><img src="/files/hjm0LJHZ7W2c8iPmAM5N" alt=""><figcaption></figcaption></figure>

You can name the spawn point by selecting the **Aa** option from the player spawn toolbar. Naming the spawn point is important if you want to create [portals](/buenoverse/interactions/portals) that go to it.&#x20;

{% hint style="info" %}
When creating a portal, you will use this name to find the correct point to link to in a room. **We recommend giving all spawn points and portals descriptive names.**&#x20;
{% endhint %}


# Elements

Elements are the building blocks of your world!

At their simplest, elements are images that you can add to a room. They can be assigned [interactions](/buenoverse/fundamentals/elements/interactions) and [hit-boxes](/buenoverse/fundamentals/elements/hitboxes), and each element gets a [z-index](#understanding-z-index) which helps position it relative to the character.

Carefully crafting your elements is key to creating an immersive feeling in your world.

{% hint style="success" %}
Want to build, but don't know where to start? You can access Bueno element kits from the [asset manager](/buenoverse/fundamentals/asset-manager).
{% endhint %}

## Adding an Element

To add an element, go to the object menu and select **Element**. It will prompt a file dialog to select your image.&#x20;

{% hint style="info" %}
You can also drag and drop images into your world when you are in build mode.
{% endhint %}

<figure><img src="/files/kTulghz56xEwP8ktzKmL" alt=""><figcaption></figcaption></figure>

## Edit an Element

Once the element is placed in the world, click on it to edit the element. From here you can add [hitboxes](/buenoverse/fundamentals/elements/hitboxes), a [z-index](/buenoverse/fundamentals/elements/z-index) and [interactions](/buenoverse/interactions/introduction-to-interactions). Read on to learn more!

<figure><img src="/files/wlZKQnezAiruCMTJV5cv" alt=""><figcaption></figcaption></figure>


# Hitboxes

Hitboxes are areas that players cannot travel through.

Do you have a wall and want the player to not be able to go through it? Use a hitbox. Is there a tree and you want the player to stop when they run into the trunk? Use a hitbox!

## How to Design a Hitbox

When coming up with the design for your hitbox, you want to think about where the area of the element is on the ground.

For example, on this tree, the trunk is sitting on the ground, so a good hitbox would only block the tree trunk.

<figure><img src="/files/IjqVBcTKR4IRrJEd6f5L" alt=""><figcaption><p>For a tree, try placing the hitbox just around the base of the trunk rather than around the entire tree. </p></figcaption></figure>

If you were to create a hitbox around the entire tree (the "bad" screenshot above), this would mean the player could not go behind the tree.

In general, smaller hitboxes feel better, since it gives the player more room to move around and go behind the element.&#x20;

Experiment with your hitboxes by running around them until they feel right!

## Check out some more examples of well-designed hitboxes below! ↴

<figure><img src="/files/i6F4Lnvh71XvwCgNiB9v" alt=""><figcaption><p>Hitboxes blocking the bottom of tree trunks, a launch pad and a waterway.</p></figcaption></figure>

<figure><img src="/files/536sqDwVd3z8C4axtixQ" alt=""><figcaption><p>Hitboxes blocking the bases of several objects in an environment, including plants and buildings.</p></figcaption></figure>

<figure><img src="/files/3iqQJFoogvxBcFl17ukx" alt=""><figcaption><p>Hitboxes blocking portions of a collection of trees, lamps and a large building. </p></figcaption></figure>


# Z-index

An important concept for making elements feel immersive is where the **z-index** is set. A good rule of thumb is to set it right where the "ground" should be for that image.

To edit the z-index, you can select your object and directly modify it with the red z-index line.&#x20;

<div><figure><img src="/files/9ZAknASh2VNjOu1P2Avl" alt=""><figcaption></figcaption></figure> <figure><img src="/files/N73fakFrapmRDGTMBqVf" alt=""><figcaption></figcaption></figure></div>

When a player is **above** the z-index line, they will appear **behind** the element.

<figure><img src="/files/DvQzL0tLAbOG6vcjMChz" alt=""><figcaption></figcaption></figure>

By placing the z-index near the top of an element, you can create elements that players can walk entirely on top of; this will make them appear as though they are flat on the ground.

<figure><img src="/files/iBiSXzMlL5FWGFs5VT4w" alt=""><figcaption></figcaption></figure>

Placing the z-index low at the base of the element will make the element appear as if it is sitting in the world.

<figure><img src="/files/semDdFypUQBM8A6cqk5u" alt=""><figcaption></figcaption></figure>

When editing elements, getting the z-index set correctly will make your world feel more immersive and alive. We recommend playing around with it until it feels right for each element.


# Interactions

{% hint style="success" %}
For a more detailed overview of interactions, check out our in-depth [interactions guide](/buenoverse/interactions/introduction-to-interactions).
{% endhint %}

Every element can have interactions added to it. Interactions are anything that a player can do when they approach the element. This ranges from something like setting off a confetti cannon, to [portaling](/buenoverse/interactions/portals) to another room, to [minting an NFT](/buenoverse/interactions/abilities/mint-machine).

Each interaction is covered in more depth in the Interactions section of the tutorial doc.&#x20;

## Adding an Interaction

To add an interaction, select an element and go to the interactions menu, marked by a lightning icon.&#x20;

<figure><img src="/files/SsqHOWRSqLSba9KKfQUS" alt=""><figcaption></figcaption></figure>

Once the interaction is added, you will see little magic dots floating up from the element. This is the indicator that the element has an interaction! As a builder in build mode, you will also see an icon that indicates the applied interaction.&#x20;

{% hint style="info" %}
Magic dots are added to interactions by default, but they can be disabled in interaction settings.&#x20;
{% endhint %}

<figure><img src="/files/aWutubYdsfbrN8X22oSU" alt=""><figcaption></figcaption></figure>

## Interaction Zone

Once there is an interaction on an element, you can then edit the **interaction zones**. This sets the area where a player can use the interaction.

{% hint style="success" %}
You can add an interaction zones can be added anywhere - they don't need to be associated with an object!
{% endhint %}

<figure><img src="/files/2B4vmyjmCf3cCAxSrkb8" alt=""><figcaption></figcaption></figure>

In the example below, there is an interaction set around the base of the piñata. Here, you can see the player is overlapped with the interaction zone, so they see the prompt to interact with the element. Confetti time!

<figure><img src="/files/8Oc6YKAyarnQBEP7mf3h" alt=""><figcaption></figcaption></figure>

You can add multiple interactions to one object, but do so with care — you do not want to confuse the player by prompting them with too many things to do. It is up to you as the builder to create experiences that make sense!


# Components

Components let builders save and recycle elements within a room. When an element is saved as a component, you can easily duplicate that element while maintaining its assigned properties - including hitboxes, z-indexes and interactions.&#x20;

## Creating and Using Components

To turn an element into a component, select the element and click **Create Component**. Once an element is converted to a component, its selection box will turn from blue to purple for easy identification.

<figure><img src="/files/YpYXdgGoi9A6p983WWDA" alt=""><figcaption></figcaption></figure>

{% hint style="info" %}
If your element has any interactions applied, those will automatically apply to your component settings.
{% endhint %}

One your component is created, you can use it across your room. You can view, add and edit all your room's components by navigating to [**Asset Manager**](/buenoverse/fundamentals/asset-manager) **> Components**.&#x20;

<figure><img src="/files/lN1HobxDJCnyiZqdNhK5" alt=""><figcaption></figcaption></figure>

You can access component from other rooms in your world by typing in that room's slug in the **Room** field.

You can grab a component you created from the asset manager and place it in a room, **or duplicate it by holding `Option+Drag (MacOS) / Alt+Drag (PC)`.**

<figure><img src="/files/Ms7ZaVVbhGt1gAhmvxfZ" alt=""><figcaption></figcaption></figure>

To unlink a component and make it a regular element again,  you can select **Detach** from the tool bar or quick edit menu on the right.&#x20;

<div><figure><img src="/files/5MJafzO9V86UrItnAxPR" alt="" width="375"><figcaption></figcaption></figure> <figure><img src="/files/1E18E8ZJUOUgwBOzLfUH" alt="" width="375"><figcaption></figcaption></figure></div>

## Edit components

Once an element is a component, new interactions and properties can be edited from the component editor menu. To edit a single component, select your element and navigate to **Edit Component**.&#x20;

<figure><img src="/files/emI3uJDWfklM1r28tz04" alt=""><figcaption></figcaption></figure>

This will bring up the **Edit Component** menu, isolating your component for more precise editing.&#x20;

<figure><img src="/files/M0fxq3z3FZjDtiJAvP20" alt=""><figcaption></figcaption></figure>

In this menu, you can add or remove additional interactions, as well as edit the hitbox/z-index and other properties.&#x20;

{% hint style="info" %}
Any changes to the component will automatically apply to all existing instances of that component. Give your new components **detailed names** if you plan to make variations with the same element!
{% endhint %}


# Asset Manager

With the asset manager, builders can re-use images and components they've placed in their room. To access the asset manager, navigate to the build tool bar at the top-center, and select **Asset Manager**.

<figure><img src="/files/N0mvM9Y7abaNj4kt5VcM" alt=""><figcaption></figcaption></figure>

The asset manager has three sections:

* **Images:** Re-use uploaded images.
* **Components:** Re-use components. Components can contain user defined hitboxes, z-indexes, interactions and more. Read more in the [Components](/buenoverse/fundamentals/components) section.
* **Kits:** Use predefined assets from Bueno. Builders can drop an asset in the room and it’ll behave like expected right out of the box!

To add an asset, simply click it, and place it in your room.&#x20;

<figure><img src="/files/83irt9SiJgqFne43iZ71" alt=""><figcaption></figcaption></figure>

You can access assets from other rooms in your world by typing in that room's slug in the **Room** field.&#x20;

<figure><img src="/files/WZ1WwgYsgdMDruzf2LIt" alt=""><figcaption></figcaption></figure>

{% hint style="info" %}
Note: You must have builder access for a room in order to pull assets from it.&#x20;
{% endhint %}


# Asset Kits

No art? Don't know where to start? No problem! Buenoverse comes with **asset kits** so you can start building your world right away.&#x20;

To get started with Buenoverse asset kits, first navigate to the build tool bar at the top-center, and select **Asset Manager**. Then, select **Kits** from the asset manager.&#x20;

<figure><img src="/files/2mo4tMLTWez74ktVpZN5" alt=""><figcaption></figcaption></figure>

All Buenoverse kit assets come complete with pre-determined z-indexes and hitboxes so they sit perfectly in the world right away!

<figure><img src="/files/eCXwPRjSHAXBWFKUqmzL" alt=""><figcaption></figcaption></figure>

{% hint style="success" %}
Did you know? All Buenoverse support tutorials are made entirely with Buenoverse asset kits!
{% endhint %}

Buenoverse asset kits come in a variety of styles and themes - from cyberpunk to medieval!&#x20;

Ready to get inspired with Buenoverse kits? Check out these awesome worlds created with asset kits:

{% embed url="<https://worlds.bueno.art/bueno/pirate>" %}

{% embed url="<https://worlds.bueno.art/bueno/barbieland>" %}

{% embed url="<https://worlds.bueno.art/bueno/lollipop-lake>" %}


# Image Generator

Whatever you need, whenever you need it! Let AI assist you with all your asset needs.

If you don't have time to look for or draw specific images, or are in need of a very specific asset, you can use the Buenoverse AI-powered image generator. The image generator will turn your rough sketches into detailed assets in seconds!

To use the image generator, simply click the **+** icon in the build menu, and select **Image Generator**.

<figure><img src="/files/1jHpO6384YczQH2733hJ" alt=""><figcaption><p>Opening the Image Generator via Build Menu</p></figcaption></figure>

Once you open the image generator, you can create an **Object** or a **Background,** and choose between 8 different styles.&#x20;

<figure><img src="/files/TPUZtN3vjCriMKGUoZIv" alt=""><figcaption><p>Element and style options</p></figcaption></figure>

Once you choose a style, draw a visual prompt (you don’t have to draw perfectly), then give a written prompt and click **Generate**.&#x20;

<figure><img src="/files/n6skec2Zw22wEH4TKQum" alt=""><figcaption><p>A drawn and a written prompt.</p></figcaption></figure>

In a short while AI will generate at least 3 images. If you don't like the outcome, you can click **Generate** again to have more variations.&#x20;

If you've chosen to create an object, you will have the option to remove the background on the generated assdet by selecting **Remove BG.**&#x20;

<figure><img src="/files/ZrePqzHWuXqHptHlMkod" alt=""><figcaption><p>Choosing a generated image and removing the background.</p></figcaption></figure>

When you are satisfied with the outcome, you can click **Add** to directly add the generated image to your world. Alternatively, you can **save as asset** to your [asset manager](/buenoverse/fundamentals/asset-manager) and use it later.


# Layers and Floors

Learn the difference between backgrounds, foregrounds and floors.

When building, you can created layered room structures. Within each room, there are 5 layers:&#x20;

* Background &#x20;
* Floors 1-3&#x20;
* Foreground

Let's walk through the features of each layer type!

## Backgrounds and Foregrounds

### Backgrounds

Backgrounds are essentially the "ground" of your room. By default, the background will be light blue. You can change the background color by navigating to [**Settings**](/buenoverse/fundamentals/worlds-and-rooms#settings) **>** [**Room Properties**](/buenoverse/fundamentals/worlds-and-rooms#room-property-settings) and entering the hex color value of your choice.

<figure><img src="/files/77a8hzgBaWlw0XhjN7zF" alt=""><figcaption></figcaption></figure>

Builders can also add elements to a background, just as they add object [elements.](/buenoverse/fundamentals/elements) Once a background element is added to the room, builders can use the background selector to move it to their preferred placement.

<figure><img src="/files/kaUb7aFR2IqkTlhlubYj" alt=""><figcaption><p>A builder moves a grass background element tile.</p></figcaption></figure>

{% hint style="info" %}
We recommend using the [snap to grid](/buenoverse/getting-started/builder-basics#grid-settings) feature for seamless background element placement!
{% endhint %}

### **Foregrounds**

Foregrounds work similarly to backgrounds, except the foreground layer is always on top of everything else. So, if the background is the ground of your room, think of the foreground as the sky! &#x20;

Just like with backgrounds, you can add elements to your foreground. Foreground elements are especially good for applying fun lighting effects to your room.

{% hint style="warning" %}
**Note:** While you can apply animations to background and foreground elements, you **cannot apply z-indexes, hitboxes or interaction zones.**&#x20;
{% endhint %}

## Floors

Floors act as layer groups in your room. Within a floor, elements have their own z-index and hitbox structure, allowing a builder to create immersive, layered environments.

{% hint style="info" %}
By default, all elements, interaction zones and hitboxes are placed on floor 1. Floor 1 sits directly on top of your background.
{% endhint %}

Builders can quickly change the floor they are building on by navigating to the filter menu in the top bar, and selecting the desired floor.

<figure><img src="/files/ZdT34PYczzDlf4V4WI82" alt=""><figcaption></figcaption></figure>

Once a builder changes the floor, all new objects will be automatically placed on that floor.&#x20;

### Moving Elements Between Floors

Builders can change the floor of already placed elements. To do this, select the element, navigate to the position menu and choose a floor to place your element.

<figure><img src="/files/ZtZalfHtQRMgGhKT8CWt" alt=""><figcaption></figcaption></figure>

#### Practical Example: Treasure Tower Part 1

In the example below, the treasure chest on Floor 1 is hidden behind the tower on Floor 1, based on the z-index placement of the tower.

<figure><img src="/files/mkdsdy0auSvzK4a85mP1" alt=""><figcaption></figcaption></figure>

However, once we change the floor placement of the treasure chest, we can now place it at the top of the tower!

<figure><img src="/files/2quZ5oNHBtiSxi54Xx67" alt=""><figcaption></figcaption></figure>

{% hint style="info" %}
By default, moving an element to a new floor will also move that element's hitbox, z-index and interactions, if any are applied. Before moving the element, Bueno will ask to confirm that you'd like to proceed.&#x20;
{% endhint %}

### Floor Changer (Ramps)

A floor changer allows players to move between floors.

To create a floor changer ramp, navigate to the filter menu in the top bar, and select **Floor Changer**.

<figure><img src="/files/N1E4qf7DLR1i71cIsZAA" alt=""><figcaption></figcaption></figure>

This will bring up a purple ramp line that can used as a gateway to another floor. You can set the floor from the floor changer edit window, accessible by clicking on the purple line.

<figure><img src="/files/AeId4TuVdZBvQ1DSrdag" alt=""><figcaption></figcaption></figure>

In the example above, the top of the line is set to Floor 2, and the bottom of the line is set to Floor 1.&#x20;

**What happens when a player crosses a ramp?**

* When a player is on Floor 1 and crosses the ramp line, it’s now on Floor 2.
* If it crosses the line again, it’s back at Floor 1.

**Hitboxes have to be added on all floors to keep the player within the desired boundaries.** At the position of the ramp, hitboxes overlap slightly to accommodate a smooth transition between floors. We'll go in depth on this hitbox structure in our example below!

#### Practical Example: Treasure Tower Part 2

In Part 1, we placed our treasure at the top of the tower. Now, let's build a ramp so players can climb the tower and claim the treasure!

We have a ladder set up, but we need to make it climbable so our player can reach the treasure on Floor 2.&#x20;

<figure><img src="/files/OQViIDimfZiylSwGDNNI" alt=""><figcaption></figcaption></figure>

First, we will start with [z-index](/buenoverse/fundamentals/elements/z-index) and [hitbox](/buenoverse/fundamentals/elements/hitboxes) placement.&#x20;

For the z-indexes, we'll set them around the back base of the tower, so our player can walk behind. The ladder's z-index should be placed *slightly* below the tower's z-index. This will ensure a smooth transition as the player climbs the ladder, and will make sure the ladder appears in front of the tower.&#x20;

<div><figure><img src="/files/jbPcJNbj7VXJORWTChc0" alt="" width="248"><figcaption></figcaption></figure> <figure><img src="/files/M47a0OH7plt1yJGOHisg" alt="" width="234"><figcaption></figcaption></figure></div>

Next, we'll set up the hitboxes on Floors 1 and 2. The hitboxes on Floor 1 block in the ladder path. On Floor 2, the hitboxes keep the player within the confines of the ladder and tower top.

<div><figure><img src="/files/iSGdm2mSM6QAmOCVdhJO" alt="" width="258"><figcaption></figcaption></figure> <figure><img src="/files/8BPOCk3LAT8jMPJMJWRb" alt="" width="259"><figcaption></figcaption></figure></div>

Notice in the full view above, **the hitboxes on each floor overlap**. This will create a seamless transition between floors once we get the floor changer placed.

Now, we will place our floor changer and create the ladder "ramp" effect between the two floors. We'll place it snuggly  underneath the Floor 1 hitbox boundary on the ladder.

<figure><img src="/files/NkUus5ndTOWTa1pqvWXd" alt=""><figcaption></figcaption></figure>

Time to try out the ladder, and claim the treasure!

<figure><img src="/files/Qe5RxR3wgZPJd1VOvO0I" alt=""><figcaption></figcaption></figure>

{% hint style="info" %}
While we can show you best practices, you may have to play around a bit to find the perfect placements to work for your structures!
{% endhint %}


# Paths

With paths, builders can make elements move around the room. The elements can have z-index, hitboxes, interactions and animations. These will all move along the path with the element.

## Create a Path

To add a path go to **Build menu > Elements > Path**.

Builders can drag the path-points to any position:

* To add a new path-branch, hover over it and click the **+** icon.
* To add a point in between existing points, hold `CMD` or `CTRL`, and click on the line.

<figure><img src="/files/3Qu0kIqrtLl0mAH3l7hA" alt=""><figcaption><p>Edit a path.</p></figcaption></figure>

## Add Elements to Path

To make an element follow the path, just drag and drop it on to one of the points. The path-point will turn green. Multiple elements can be on the same path.

There’s a few settings builders can edit:

* The speed at which the elements move.
* The direction the elements should move in (left, right and both).

In the example below, we've placed a guard on a patrol path, moving in a single direction around our treasure-topped tower.&#x20;

<figure><img src="/files/y8KMwT9Aw0nIbdDvC323" alt=""><figcaption><p>Place objects on a path.</p></figcaption></figure>


# Sprite Animation

Bring your environments to life with animated sprites.

Sprites work the same way as gifs. Builders can upload a sprite image that will automatically animate if it meets a few requirements.

{% hint style="info" %}
**To animate in Buenoverse, a sprite needs:**

* A minimum of 2 image "states".
* Images placed directly below each other.
* Exact same image frame dimensions.
* Images grouped and exported together as a single image.
* Image title name ending in "sprite-\[# of frames]"
  {% endhint %}

#### Practical Example: Jack-o-lantern Sprite

Let's walk through a simple example and create a spooky, flickering jack-o-lantern using Figma. &#x20;

For this example, we will have two image states - ***on*** and ***off***. Since the sprite has 2 frames, we will title the image group "Pumpkin-*sprite-2*".

<figure><img src="/files/2fXGehFr9ugvfPvwsRm9" alt=""><figcaption></figcaption></figure>

Notice that each of our pumpkin images are placed in frames of the exact same size (258 x 550). Next, we'll group the two frames together, taking care that the frames are aligned, and then export as one image.

<figure><img src="/files/uJQNryqapkHQ9gAzoSAY" alt=""><figcaption></figcaption></figure>

Finally, we will place the image into our room as an element. The Buenoverse will automatically pick up on this sprite, and add it as an animated asset!

In the sprite menu, builders can alter the frame rate of the sprite, and choose settings for auto-play and loop.&#x20;

<figure><img src="/files/TGHTatJO1mQtzANg7IES" alt=""><figcaption><p>Edit the frame rate of a sprite.</p></figcaption></figure>


# Sounds

Add sounds to immerse your players in your world's environment.

## Global Sounds

In the Buenoverse, builders can alter global sounds, like player movement and interaction sounds. The global sounds change for every room in your world. The global sounds can be changed from **World Settings**.&#x20;

<figure><img src="/files/zn34dKzi64Jg7OWUp1NX" alt=""><figcaption></figcaption></figure>

From the global sounds menu, you can preview sounds, toggle sounds on or off, and upload new sounds.

<figure><img src="/files/AR0QWKqJqA1U0KX4fBtt" alt=""><figcaption></figcaption></figure>

## Interaction sounds

Builders can add custom sounds to any interaction. In this example we’ll show how sounds for dialogues work!

Unlike global sounds, **interaction sounds will only affect the specific object you select**. Other interactions will still use the default sounds set via world settings.&#x20;

Builders can change sounds by going into the interaction menu (highlighted in blue) of the object and choose **Sounds**.

<figure><img src="/files/g3BTMDtmmtG480uM2UCj" alt=""><figcaption><p>How to edit interaction sounds.</p></figcaption></figure>

Each interaction type has its own customizable sounds. In this case builders can change the sounds that belong to the dialogue interaction:

* **Start sound** plays when the dialogue starts.
* **Submit sound** plays when the player continues the conversation.
* **Type letter** plays when letters appear on screen.
* **Give item** plays when NPC gives the player an item.
* **Take item** plays when the NPC takes an item from the player.


# Video

It’s possible to add a Youtube video (or Youtube livestream!) into a room by going to **Build Menu > Elements > Video**. Builders can alter the floor placement of the video as well as the z-index, like any other element.&#x20;

<figure><img src="/files/wcpGA3pN77nlyc9ONzWR" alt=""><figcaption></figcaption></figure>

Videos will autoplay once it enters the players viewport. When a player moves away, the video will keep playing.

<figure><img src="/files/ZvPKczmsYeNE4Ml8BjAK" alt=""><figcaption></figcaption></figure>

{% hint style="info" %}
The playback is client side, so players can control when the video plays and pauses.&#x20;
{% endhint %}


# Introduction to Interactions

Applying interactions to your Buenoverse elements can create a dynamic, immersive experience for your community and bring your art to life!&#x20;

In this section, we will go in-depth into each interaction type. There are currently four main categories of interactions:

* Portals
* Effects
* Abilities
* Dialogue
* Games


# Full walkthrough

In the following section, we'll go through every interaction option available. It's a good way to get a grasp on how interactions work in the Buenoverse.&#x20;

Keep reading to learn all about interactions, or dive right in with the tutorial videos below:

{% embed url="<https://www.youtube.com/watch?v=-Jgq6mRnSrI>" %}

{% embed url="<https://www.youtube.com/watch?v=EnBYyRKGXAE>" %}

### Practical Example: Confetti Cannon

We'll take a simple confetti effect as an example. These settings can also be applied to abilities interactions, portals, external links or other effect interactions.&#x20;

{% hint style="info" %}
It's also possible to have **multiple interactions on the same object.** For example: a confetti interaction combined with a dialogue interaction.
{% endhint %}

### **Here's the topics we'll cover in this walkthrough:**

* Adding an interaction
* Editing the interaction zone
* Editing permissions of the interaction
* Adding XP rewards to the interaction
* Adding sound effects to the interaction
* Removing the interaction

## Adding an interaction

The confetti effect can be used to celebrate, party, and is used by tapping the letter **E**.

To add this effect, first select an asset. Then, go to **Interactions⚡️> Effects🪄> Confetti🎉**

<figure><img src="/files/TJUzoZdRAvsLNHaKdnBm" alt=""><figcaption><p>The effects menu under interactions.</p></figcaption></figure>

Once the builder has applied the effect, a magic wand icon🪄 will appear over the asset. Additionally, a new menu, highlighted in blue, will show options available for the confetti interaction.

<div align="left"><figure><img src="/files/mRNI7iqW3ZGu5RoQtUyK" alt="" width="563"><figcaption><p>Confetti effect applied to an object element.</p></figcaption></figure> <figure><img src="/files/VvgTFdNFMSQfTEzGbITz" alt=""><figcaption><p>Edit effect pop-up menu.</p></figcaption></figure></div>

## Editing the interaction zone

Now that the interaction is applied, players can interact with the asset by getting close to the object. **The interaction zone can be adjusted to fit a certain shape or span a larger area**, so that the interaction can be easily to detect by the players.

The interaction zone works similarly to a hitbox. It can be adjusted manually by dragging the points, or adding points by clicking on a line.

<figure><img src="/files/7eXjzPQPkBgFqHadfk0u" alt=""><figcaption><p>Adjusting the interaction zone.</p></figcaption></figure>

Once the interaction zone has been adjusted, whenever a player is in range, an instruction message is shown that explains how to interact with the object. In this case, the player will interact with the asset by tapping the blue button or pressing **E**.

<figure><img src="/files/H1lHmAqNkrJv9M2QE0Fq" alt=""><figcaption><p>Player instructions to interact with the confetti effect.</p></figcaption></figure>

## Setting permissions&#x20;

Builders will be able to configure the permissions on interactions. This is used to **allow** or **block** access to:

* A single player
* A group of players
* A player with item `X`
* A player with `X` amount of XP
* A player with `X` level

Builders can add a message to instruct players how to get the required permissions.

<figure><img src="/files/J7Ir444RGhEmeVBDZvBd" alt=""><figcaption><p>Permission options, including a message for players that don't have access.</p></figcaption></figure>

## Adding XP

Builders can add and adjust the amount of gained experience points when a player uses the interaction, as well as how often the player will be able to gain this experience.

<figure><img src="/files/mBsT9zUu4ytweO9MRKlo" alt=""><figcaption><p>Experience points options for players.</p></figcaption></figure>

## Adding sound effects

Builders can add or edit the sound effect of the interaction by going to **Confetti > Sounds**. In this screen, builders can:

* Play the current sound effects.
* Add custom sounds.
* Turn sounds on and off.

<figure><img src="/files/R6hMxh0X3VJzpJWj5Hfk" alt=""><figcaption><p>Sound options for the confetti effect interaction.</p></figcaption></figure>

## Remove the interaction

To remove the interaction completely, go to **Confetti > Remove.**

When removing an interaction, every changed option associated with it will also be lost.&#x20;


# Portals

Portals are main mechanic for moving through your world.

## Same-Room Portals

To set up a same-room portal, begin with a portal [spawn point.](/buenoverse/fundamentals/player-spawn-points) This spawn point will be the place where characters will appear in the world after they have used the portal.&#x20;

<figure><img src="/files/GXi9ZDA7y53A6Y17izqH" alt=""><figcaption></figcaption></figure>

We've named this new spawn point "portal," so we can easily find it from our spawn point options.&#x20;

{% hint style="info" %}
If you are not familiar with Spawn Points, visit the [Spawn Point](/buenoverse/fundamentals/player-spawn-points) section to learn how to create them.
{% endhint %}

Next, find an object you'd like to turn into a portal. The avatar is standing next to our portal object on the left, and we've also placed a portal object to the right, underneath the portal spawn point.

<figure><img src="/files/uxiv0yEwtLsQWS3Z5ZHu" alt=""><figcaption></figcaption></figure>

Select the portal object, and navigate to **Portal** from the interactions tool bar.&#x20;

<figure><img src="/files/licjSjZU364yN3xT1bvk" alt=""><figcaption></figcaption></figure>

This will bring up the portal options menu. From here, you can select your portal destination spawn point. &#x20;

<figure><img src="/files/nWG2FtyKl17pkJig7voy" alt=""><figcaption></figcaption></figure>

You can also use this menu to select other portal options including portal indicator animation, instant activation, permissions, XP options and sound effects.&#x20;

<figure><img src="/files/kixKMMIXRrQdsusQqowa" alt=""><figcaption></figcaption></figure>

We have selected the "portal" spawn point, and set the portal to be "instant". Instant portals just mean that the player wont be prompted to enter the portal, it will happen right when they run into it. Let's test it out! 🧪

<figure><img src="/files/sY9z0uyYyCO9EDIF5RNE" alt=""><figcaption></figcaption></figure>

Just like magic! 🪄 But, it's not quite complete. To create a two way portal, simply create a second portal spawn point and follow the same steps for the right side portal object.

<figure><img src="/files/Tn245HYuU6wMPWd6zcPi" alt=""><figcaption></figcaption></figure>

<figure><img src="/files/IyERHn67tZRcYNYelCW0" alt=""><figcaption></figcaption></figure>

## Portals to Other Rooms

You can also create portals between different rooms in your world, or to another world entirely. All you need is a room URL slug, and you're ready!

For this example, we will create a treehouse using two demo rooms:

{% code fullWidth="false" %}

```
https://verse.bueno.art/demo

https://verse.bueno.art/demo/treehouse
```

{% endcode %}

<figure><img src="/files/ZhwQhksxOJuUM3IFGK6o" alt=""><figcaption></figcaption></figure>

Once the starter and destination rooms are ready, you'll first want to create a spawn point in your destination room. In this example, we've named the destination spawn point "treehouse."&#x20;

<figure><img src="/files/bPnMqDwPdPHzp6JoOC5y" alt=""><figcaption></figcaption></figure>

Next, we will select an object to turn into a portal in our starter room. For access to the treehouse, we've set up a convenient ladder.

<figure><img src="/files/zCuMJKOAzKH6so5H3ukd" alt=""><figcaption></figcaption></figure>

To the spawn point located in the destination room, you'll want to enter the URL slug of that room.&#x20;

Since our destination URL is:

```
https://verse.bueno.art/demo/treehouse
```

The URL slug will be:

```
demo/treehouse
```

Once you've entered in the destination room's slug, you can select from all available spawn points. For us, that is "treehouse."&#x20;

Once the portal is linked, we're ready to go!&#x20;

<figure><img src="/files/02W5pQpN4xt8ErZeFTSo" alt=""><figcaption></figcaption></figure>

{% hint style="info" %}
Note: You can only make portals in rooms where you have builder permissions. This means if you make a portal to a world/room you cannot build in, you will not be able to make a two-way portal.&#x20;
{% endhint %}


# External links

In the interactions menu of an element, builders can choose to add an external link. Just put in the URL you want to link to and adjust the size of the interaction zone to your liking.


# Effects

<figure><img src="/files/pJhk06kAbGixvt7GtpO0" alt=""><figcaption></figcaption></figure>

As a builder, you will find that effects are a powerful tool to add immersion to your world. You can add various effects to the objects in your world such as:

* Animation
* Music
* Sounds
* Confetti, Fireworks and Smoke

Let's take a look at each one of them!


# Animation

Hmm... That horse looks too stale. Let's make it dance!

Builders can add CSS animations to any object. The most used forms of animations are to let an object move from side to side, up and down or let it rotate.&#x20;

To learn more about animating objects in the Buenoverse, read on, or check out the video tutorial below:

{% embed url="<https://www.youtube.com/watch?v=4OvPec6daXM>" %}

To add animation to an object, go to **Object menu → Interactions → Effects → Animation**

<figure><img src="/files/nC2qo1WS15WMsJtRR28q" alt=""><figcaption><p>Object menu → Interactions → Effects → Animation</p></figcaption></figure>

You can choose the premade animations or make your custom animation using timeframes and basic editing options.

At the top you will see Idle and Enter/Exit;

* Idle; The animation which will play from the moment you enter the room.
* Enter/Exit; The animation will play only if a player enters/exits the [interaction zone](/buenoverse/fundamentals/elements/interactions#interaction-zone) of an object. (Can set different animations each for enter and exit.)

Once you choose a pre-made or custom animation option you will see that the animation icon is added to the object bar in blue indicating that it is active.

<figure><img src="/files/6t6fTYVcRSErpMC25Iqy" alt=""><figcaption></figcaption></figure>

Once you click on it you will be able to see various options such as;

1. **Remove animation;** removes the animation from the object
2. **Idle - Enter/Exit;** changes between idle and enter/exit mode.
3. **Change animation;** opens the animation selection window.
4. **Edit animation;** opens the edit animation window.
5. **Toggle loop;** if selected activates loop for animations or if not animations play only once.
6. **Edit animation time;** determines how long the animation lasts in seconds
7. **Adjust transform origin;** Let’s you adjust the origin of transform.

<figure><img src="/files/9c3c8VLzIQxmJPxmC4VA" alt=""><figcaption><p>Animations window</p></figcaption></figure>

**Custom Animations**

If you click on edit animation, the edit animation window will open, there you have some of the same options as well as the timeline option which let’s you create your own animations.

Pressing the Plus Icon beside the Timeline option will add a timeline frame to the list. Then you can start editing the options within a timeline frame in order to create a motion. By adding a timeline frame and editing the movements you can create an animation.

Let’s take a look at some of the options in the timeline.

**Time**: How long does the motion last until it reaches the next frame. It is different from the animation time, where the time of the whole animation is decided.

**Movement**: Adds movement to the directions Up/Down and Left/Right.

**Rotation**: Adds Rotation to the X,Y,Z axes.

**Scale**: Adds scale animation, increasing or decreasing the scale of the object in X and Y axes.

**Skew**: Adds a skew animation to the X and Y axes.

### Let’s see animation in action!

Let's go through a custom animation process step-by-step.

I want this relatively giant spider hanging from the traffic lights to swing side-to-side.

<figure><img src="/files/HrYy4e4DSzSMojDzlWny" alt=""><figcaption><p>That spider looks very frozen right now.</p></figcaption></figure>

We click on our spider and then go to **Interactions → Effects → Animation**

<figure><img src="/files/gUenTMv54S2OsuA2mPa0" alt=""><figcaption><p>Object menu → Interactions → Effects → Animation</p></figcaption></figure>

I want this to be an idle animation so I stay in **Idle** and choose **Custom**.

<figure><img src="/files/mhTMlvsrNaNDZHeGzgPg" alt=""><figcaption><p>Choosing custom in idle tab</p></figcaption></figure>

You can now see the animation icon added and active in the **Object menu**. Next we click it and then click the **Edit** button beside the **Custom Animation** in order to open the  **Edit Animation** window.

<figure><img src="/files/S1FkWP4Hgp9Mr7wDJhRJ" alt=""><figcaption><p>Object Menu -> Animations -> Edit</p></figcaption></figure>

Next we will add a time frame by clicking the **+** icon next to Timeline.

<figure><img src="/files/etbUOry8pH6ikuyVhdJQ" alt=""><figcaption><p>Edit Animation window</p></figcaption></figure>

We want our Spider to swing so first we will start our animation from the right sight.  We click **Rotation** icon, and then choose a value on the **Rotate X** bar in order to move the Spider. You can either use the slider or enter a specific value in the box beside.&#x20;

<figure><img src="/files/E6TLtVdqUIjj9QtYSTR1" alt=""><figcaption><p>Adding rotation to the starting frame</p></figcaption></figure>

Our starting frame is done, now our spider will start swinging from the right side. Now we need another frame and enter the exact opposite values to swing our spider to the left. Since this will be a loop there is an easier way to do it. Simply duplicate the frame by clicking the three dots on it's side and then, remove or add "-" to the previously entered values to reverse them.

<figure><img src="/files/vJtHHpSzB7iI2irUNxTU" alt=""><figcaption><p>Duplicating the first frame and reversing the values to get a rotation to the left</p></figcaption></figure>

Amazing, now we have spider swinging from right to left. But in order to complete the loop we need it to swing from left to right as well. Again we can either add a new time frame and enter values. BUT the first frame is exactly what we want we don't even need to change the values so let's just duplicate it, and this time simply edit the time to a higher value than our second frame so it is initiated after the second frame.

<figure><img src="/files/Nfp5k82iAfWs2ez8iuqI" alt=""><figcaption><p>Adding our last frame by duplicating the first frame and editing the time value</p></figcaption></figure>

Not bad, but our Spider doesn't look like it is swinging. It looks like it is having a seizure. That's because the **transform origin** is located in the middle as default.  If builders use a rotate animation, they can alter the point of origin. This is point is where the rotation will revolve around. So we need to make the origin the top of the web. Let's click the **Adjust Transform Origin** button and then click on top of the web.

<figure><img src="/files/ta6AGG2FOwfB95GJWDiF" alt=""><figcaption><p>Adjusting transform origin</p></figcaption></figure>

Our animation is almost complete, the Spider is swinging too fast in my taste, if it keeps going like this It's going to get dizzy.  Let's edit the time values so that it is slower.

<figure><img src="/files/eQNFOtUaSxOM5YM4qNdU" alt=""><figcaption><p>Editing time values</p></figcaption></figure>

Voila! Our Spider is now happily swinging.

<figure><img src="/files/9e1zVo7PRTB2VI8EMi3I" alt=""><figcaption><p>Happy swinging spider</p></figcaption></figure>


# Music

Builders can add music to a room, or stream music from one room to another. This feature is mostly used to organize musical events in the Buenoverse or to add background music/effects to a room.

To add a track, create an interaction zone on an object, or just a global one, and go to `Interaction menu / Effects / Music`

After assigning the music interaction to the zone, the music menu appears in the object menu.

**The menu shows a few unique options**

* Add tracks Add a new track to the playlist
* Remove tracks Remove tracks from the playlist
* Connect sprites (Feature flag?) Let sprites animate with the frequency of the music
* Broadcast to another room (Feature flag?) Stream the same playlist to another Buenoverse room.
* Show music title When players move over the zone, they can see the tracks title.

<figure><img src="/files/mh2CnxqxQsBkVEF79mKC" alt=""><figcaption><p>Music menu</p></figcaption></figure>

### Add tracks

In the ‘Add track’ screen, builders can upload individual tracks and album art. Both fields are required. Every track will be saved in the playlist.

### Play tracks

To play tracks, move the playable character over the interaction zone and click the blue pill button in the bottom of the screen.

<figure><img src="/files/S0EqpYa1KPjmDMRbZnpW" alt=""><figcaption></figcaption></figure>

After clicking, the playlist screen opens. Players can pick a track here, put it on repeat or shuffle.

{% hint style="info" %}
It’s recommended to gate this interaction to a specific group of users, like builders. This prevents visitors from turning the music on and off.
{% endhint %}

<figure><img src="/files/EJpeRpy1bMjx4EkSETBl" alt=""><figcaption><p>The music playlist view</p></figcaption></figure>

### Connect sprites

Builders can connect sprites to the music that is playing, it animates the sprite to the frequency of the music. Read more about how to create sprites.


# Sounds

What is it that I hear? -The sound of your imagination.

You can add **Sounds** to your **Objects** which can be triggered when a player enters or leaves an [**interaction zone**](/buenoverse/fundamentals/elements/interactions#interaction-zone).

<figure><img src="/files/ZkRUVAEGyTYNTuS48YKZ" alt=""><figcaption><p>Sounds menu</p></figcaption></figure>

If you choose "Play only once" then the sound will be played only one time after entering a room.

You can chose a sound by clicking on the **pencil** icon and test it by pressing the **play** icon.&#x20;

You can choose different sounds each for entering and exiting an [**interaction zone**](/buenoverse/fundamentals/elements/interactions#interaction-zone).


# Confetti, Fireworks and Smoke

These 3 interaction effects work the same way. To add, go to `Interaction menu/Effects/Smoke`

* Confetti shoots confetti out of the object
* Fireworks shoots fireworks out of the object
* Smoke blows smoke out of the object

Use these effects scarcely because they can have a big impact on performance when lots of players use it at once.&#x20;


# Abilities

![](/files/jFVXg3zryhgFE7AJyE6B)

Abilities are the primary tools of interaction to make your world alive! As a builder you can make the objects and elements in your world interactable with many different abilities, creating your own games, hubs, and various different progressions. \
\
You can add abilities such as;<br>

* Dialogue
* Collectible
* Mountable
* Driveable
* Transporter
* Movement
* Thrower
* Damage
* Health
* Mint Machine
* Dress Up

Let's take a closer look at each one of them;


# Collectible

Pick up, collect, equip, throw and have fun with it!!!

Builders can create collectibles that players can collect and use. Collectibles can also be used to **Item gate** interactions. For instance, only players with an apple in their inventory can enter a certain portal, or talk to a particular NPC.

**Without the use of an element spawn, the collectible can only be collected by 1 player.** More about element spawns further on.

#### Types of collectibles:

* **Inventory item** This can be picked up from the ground or given to you, or taken by, a NPC.
* **Wearable item** This is an item players can wear on their character.
* **Throwable item** To use in games. Players can wear and throw the item.

### Add a collectible

To create a collectible

* Make the object a [**Component**](/buenoverse/fundamentals/components)
* Then edit the component by going to **Component menu ->** [**Edit component**](/buenoverse/fundamentals/components#edit-components)
* In the Edit view, click Abilities -> Collectible

<figure><img src="/files/2P20QHTdzaILGKPPlZh9" alt=""><figcaption><p>Edit the component to make it a collectible item</p></figcaption></figure>

### Collectible Settings

After creating the collectible, a panel shows up. Here, builders can edit the behavior of a collectible.

#### Settings Rundown;

* **Description** This is the description that shows in the players inventory after collecting the item.
* **Max count per player** How many pieces of this item a player can carry in their inventory
* **Should the player pick it up automatically?** If turned on players can pick up the item by simply touching it
* **Can a player steal it from another player?**  `to be tested-`

**Equippable;**

* **Can a player equip it?** This let’s players equip the collectible on their character, like a wearable
* **Can a player unequip it?** If turned on players can unequip the item to their inventories
* **Should the player equip it automatically on pick up?** If turned on a player will automatically equip it on pick up

**Throwable;**

* **Can it be thrown?** This let’s the player throw the item by pressing `Q`
* **Should it be destroyed on hit?** The collectible is destroyed when it hits a designated target. Like another player.

**Droppable;**

* **Can a player drop it voluntarily?** When turned on, players can drop the item via their inventory
* **Can a player drop it in other rooms?** If turned on, players can drop the item in other rooms
* **Should the player automatically drop it on kill or hit?** If turned on, player will drop the item on hit or kill
* **Should the player automatically drop it if leaving the room?** If turned on players will leave drop the item upon leaving the room

<figure><img src="/files/THmmDJ6VSefXqpYq3gQf" alt=""><figcaption><p>Collectible Settings</p></figcaption></figure>

<figure><img src="/files/rq1YdGINSgvyO7IKcaSA" alt=""><figcaption><p>Example of a throwable collectible item</p></figcaption></figure>

### Permissions

Builders are able to set permission to collectibles, the same way as for any other interaction. For example, only players that have an apple in their inventory can pick up the collectible. Or, only players with a specific NFT trait.

### Quantity menu

Builders can set the amount of instances of the collected item. This is done in the quantity menu. In this case, a player only recieves 1 crystal when it’s collected. If the player recieves more than 1, the amount will be shown in the players inventory.

<figure><img src="/files/wpOm4OTlhLsVPCaue6hQ" alt=""><figcaption><p>Quantity menu of a collectible</p></figcaption></figure>

### Spawn a collectible

Builders can let collectibles spawn in the room by using an ‘Element Spawn’. This works the same as a player spawn but instead of spawning a player, it spawns a collectible. Without the use of an Element spawn, the collectible can only be picked up by **1** player.

#### Use element spawns

To add an element spawn, go to `Build menu / Object menu / Element Spawn`.

<figure><img src="/files/FRwqS6LUzLKmanCNaVh0" alt=""><figcaption><p>Add a spawnpoint</p></figcaption></figure>

After adding the spawn point, a panel will appear.

#### Settings rundown

* **Collectible picker** Click the checkered box, or the edit icon to pick the collectible you want to spawn.
* **Interval** The time between each new item spawn. In this case, a new collectible spawns every second.
* **Quantity**

  This is the same setting as the quantity menu for a collectible item, but specific to this spawn point. It overrides the quantity added in the component.
* **Spawned instance limit**

  The max number of collectibles to be spawned. Not to be confused with the quantity of a collectible. If the ‘Quantity’ of an item = 10, and the ‘Spawned instance limit’ = 5, players can collect 5 stacks of 10 collectibles. Spawning stops after the limit of 5 is reached.
* **Spawned instance count** A log of how many collectibles have already spawned.

<figure><img src="/files/py5at2ZxCnrt4K47uqYa" alt=""><figcaption><p>Spawn point options</p></figcaption></figure>


# Mountable

Builders can make objects mountable. When a player is mounted on an object, they move along with the motion of an object.

<figure><img src="/files/BN35oE1hkspYYEpTKMNL" alt=""><figcaption><p>Mount menu</p></figcaption></figure>

### Mounting between floors

Players can mount objects on the same floor, or between floors. When a player mounts an object, the player moves with the direction the object is going in. This could for example be an animated object, or a drivable object.

<figure><img src="/files/4zy701CND7258wDDYkFa" alt=""><figcaption><p>Example of a fully configure mountable object</p></figcaption></figure>

To let players mount between floors, the builder has to add a mountable interaction zone on floor 1, and add another zone on the floor they want the player to mount to.

When a player moves to floor 2, the interaction zone on floor 1 isn’t accessible anymore. THat’s why the object needs 2 mountable interaction zones on different floors. But, those zones are linked to each other through the mount menu. You can easily set the floor to mount to, and to dismount to, in the mountable menu of the object. It will update the setting to both interaction zones.

<figure><img src="/files/Ia4NPSH3jfGNt2Z3bO5v" alt=""><figcaption><p>After adding interaction zones on both floors, edit the mount settings in this menu.</p></figcaption></figure>

### Under the hood

A short example of what each mountable interaction zone does.

**Interaction zone red**

* Is positioned on floor 1
* Moves the player to floor 2. (Mount)

<figure><img src="/files/ko92546cGSW87nEvCaOi" alt=""><figcaption><p>Red interaction zone</p></figcaption></figure>

**Interaction zone blue**

* Is positioned on floor 2
* Moves the player to floor 1. (Dismount)

<figure><img src="/files/yDK7m2wk4z4Bf6mOpFD3" alt=""><figcaption><p>Blue interaction zone</p></figcaption></figure>

### Hitboxes on mountable objects

When a player mounts the object, on the same floor or between floors, they are always confined to the bounding box of the objects image. Builders can make the confined area smaller by excluding parts of the image with hitboxes.

#### Examples

On floor 1, we want the car to behave like a regular object that we can bump into and go in front or behind of. So the z-indexing and hitboxes on floor 1 are no different from any other object.

<figure><img src="/files/5aPgmuAgXrARjVdoCBRP" alt=""><figcaption><p>Floor 1 hitboxes</p></figcaption></figure>

On floor 2, the player is confined to the edges of the image but we need the area to be smaller in this example. We have to exclude areas within the bounding box of the image te keep the player confined to a certain area. Here’s an example.

<figure><img src="/files/Eb9Jlba4H3XUhhcspbij" alt=""><figcaption><p>Floor 2 hitboxes</p></figcaption></figure>


# Drivable

Builders can make an object drivable in 2 ways. Remote controlled or a vehicle.

### Vehicle

By default the drivable interaction requires a mount. When a player mounts the object, they can press a button to start steering the object. Players will move with it’s motion. This interaction works right out of the box when the object is already mountable. Multiple players can drive the object at once. The more people steer in 1 direction, the faster the object goes.

**Keep in mind that the drivable object does not account for hitboxes so it can go anywhere in the room.**

<figure><img src="/files/U2oHy505Qo6dkfrQGhXp" alt=""><figcaption><p><strong>An example of a drivable vehicle</strong></p></figcaption></figure>

### Remote control

To remote control an object, disable the ‘Require mount’ setting in the drivable menu. In this menu builders can also alter the movement speed of the drivable object.

<figure><img src="/files/UeayVe5DQObs75rpCFOa" alt=""><figcaption><p>Drivable menu</p></figcaption></figure>

<figure><img src="/files/WJxOviPG2w9DKrSboBGl" alt=""><figcaption><p>A remote controlled drivable object</p></figcaption></figure>


# Movement

The movement ability let’s builders alter the speed of players, or convey them, when they move over the interaction zone. It’s also possible to stack movement zones.

<figure><img src="/files/r5zhCzo922teAzZteaIt" alt=""><figcaption><p>Add movement</p></figcaption></figure>

A modal opens after adding the movement ability. It has a few settings builders can change.

There’s 2 options to choose from.

1. **Boost**

* Can let the player move slower or faster as they move within the zone.

<figure><img src="/files/ha0zTV86Dl7oCJYSIwtG" alt=""><figcaption><p>Boost options</p></figcaption></figure>

**2. Conveyor**

* Transports the player at a certain speed and direction. Like a conveyor belt.

<figure><img src="/files/x0kDqucEiqnt8qvuGxgA" alt=""><figcaption><p>Conveyor options</p></figcaption></figure>

In both movement types, builders can alter the speed of the movement by dragging a slider. The conveyor option also has a setting where the builder can input degrees to push the player in a certain direction.

<div><figure><img src="/files/Sp28mgH03QHm1ZzamMkR" alt=""><figcaption><p>Boost example</p></figcaption></figure> <figure><img src="/files/4WcYcgJeKC3aPvaLu0YH" alt=""><figcaption><p>Conveyor example</p></figcaption></figure></div>


# Thrower

An easier way to distribute items...or damage players

Thrower is an ability that let's you make an **Object** throw another **Object**. It is a very neat way of either handing out a specific item fast or creating a turret that shoots at players.

In order to give the **Thrower** ability we go to **Object Menu -> Interactions -> Abilities -> Thrower**

<figure><img src="/files/wtABN56qjS6mCo1joDAc" alt=""><figcaption><p>Object Menu -> Interactions -> Abilities -> Thrower</p></figcaption></figure>

In the thrower menu, you can choose which item will be thrown by clicking the pencil icon. Once clicked you will see a small window with the **throwable collectibles** in it. In order to set  a **throwable collectible** you can check our guide [here](/buenoverse/interactions/abilities/collectible).

<figure><img src="/files/xvL2QkDlsZIHvwcVvTNS" alt=""><figcaption><p>Choosing a throwable object</p></figcaption></figure>

You can set the interval time between the throws. In order to randomize a bit you have the option to set a **minimum** and **maximum interval** between the throws. For example if you set minimum interval to 1 and maximum interval to 10, the object will be thrown randomly between 1 to 10 seconds. If you want a steady throw time, just enter the same amount in both minimum and maximum.

<figure><img src="/files/5hsq9grXW2Yzr8w0xF2e" alt=""><figcaption><p>Setting minimum and maximum interval between throws</p></figcaption></figure>

Once everything is set the, Thrower object will throw the throwable object to the players who enters it's [interaction zone.](/buenoverse/fundamentals/elements/interactions#interaction-zone)


# Damage

Ouch, that hurts!

You can give any object the **damage** ability. When done it will be able to hurt your players. Let's see how!\
\
First things first; **Object Menu -> Interactions -> Abilities -> Damage**

<figure><img src="/files/Q54zXiMYHKeHdcMxtkNa" alt=""><figcaption><p><strong>Object Menu -> Interactions -> Abilities -> Damage</strong></p></figcaption></figure>

On the **Damage** menu you can set **Minimum and Maximum damage per second** and the object will inflict damage between those values. For example; if you set **Minimum** value 5 and **Maximum** value 10 the object will randomly inflict 5, 6, 7, 8, 9 or 10 damage per second.

If you turn on the **Enable only when the object is thrown,** the object will inflict the damage only when thrown, for more info on throwing check the [**collectibles**](/buenoverse/interactions/abilities/collectible). If you don't turn on this option, object will inflict damage when a user enters it's [**interaction zone**](/buenoverse/fundamentals/elements/interactions#interaction-zone).

<figure><img src="/files/9GvcEuE7N2GRKNzDt5FB" alt=""><figcaption><p>Damage menu</p></figcaption></figure>

By combining different abilities and options like **Damage**, [**Health**](/buenoverse/interactions/abilities/health) and [**Paths**](/buenoverse/fundamentals/paths) you can create enemies in your world.


# Health

Payback time!

You can add health to the objects so that they can be destroyed when hit. It is very easy to set; Go to **Object Menu -> Interactions -> Abilities -> Health**

<figure><img src="/files/x4aFGPH0gKQZzZRPsxWs" alt=""><figcaption><p>Object Menu -> Interactions -> Abilities -> Health</p></figcaption></figure>

From the Health menu you can enter a value to set the **HP** for the object.

<figure><img src="/files/kUZnFtj8zxUnx24uE7qA" alt=""><figcaption><p>Health menu</p></figcaption></figure>

If you click on **Advanced** you can set the where the HP bar stands on the object by dragging or clicking on the **HP bar vertical offset** slider.

<figure><img src="/files/Ga8FpLBIPOH6iRA5SVY8" alt=""><figcaption><p>Setting the HP bar vertical offset</p></figcaption></figure>

By combining different abilities and options like [**Damage**](/buenoverse/interactions/abilities/damage), **Health** and [**Paths**](/buenoverse/fundamentals/paths) you can create enemies in your world.

To learn more about health and damage abilities, check out the video tutorial below!

{% embed url="<https://www.youtube.com/watch?v=-Jgq6mRnSrI>" %}


# Mint Machine

Create a mint event in your world!

To implement a mint machine, you will need to already have a smart contract deployed.&#x20;

{% hint style="info" %}
To learn more about creating a smart contract with Bueno you can read about it in our [Smart Contract Deployer](https://docs.bueno.art/smart-contract-deployer/) section of the docs.
{% endhint %}

First, select the object that you would like to turn into a mint machine. Then, navigate to **Interactions > Abilities > Mint Machine**.

<figure><img src="/files/sQWT5Wjtg1W6id5ENvKp" alt=""><figcaption></figcaption></figure>

If you launched your contract with Bueno, creating a mint machine is as simple as selecting your Bueno project and contract from the drop down menus.&#x20;

<figure><img src="/files/LhmqEVSPCHKgVGPCBdgl" alt=""><figcaption></figcaption></figure>

If the contract was deployed outside of Bueno, toggle off the **Bueno Contract** button. You'll need the contract address, contract method (usually "mint"), cost and max per transaction. Paste all of the required variables into the form, taking care that they match with your contract and select **Save Configuration**.&#x20;

Once configured, players will be able to walk up to the machine and mint from the provided contract!


# Dress Up

Under Construction


# Dialogue

The dialog interaction tool lets you create non-playable characters (NPCs), breathing life into your world!

{% embed url="<https://www.youtube.com/watch?index=3&list=PLbG4lDfPqmZuqSWQTvQ6IbcIGDpkZGt1a&v=JLY1m-cXO4o>" %}

It is very easy to do; first, click on an object in build mode and choose **Interactions > Abilities > Dialogue.**

<figure><img src="/files/kjCUakrueQNoK8akrhxV" alt=""><figcaption></figcaption></figure>

This will open the dialogue builder menu where you can design the interaction. The dialogue is set up as a decision-making tree, where each step is configurable.

<figure><img src="/files/ITTzzLBi9m0EpBsv23Rd" alt=""><figcaption></figcaption></figure>

You can have the player answer questions, check for trait-gated permissions, and many other different options.

<figure><img src="/files/x7Dr7r3Ubra4MEB0ZBBs" alt=""><figcaption></figcaption></figure>

Each block is a different dialogue choice which can be edited in its respective text field. If you want to have more dialogue options, click on the **+** sign each block originates from.

<figure><img src="/files/vJHWN2nNAbXGHdRaq1WI" alt=""><figcaption></figcaption></figure>

Each block can be set to either **continue** to the next block, **restart** the whole conversation, or **end** the conversation. You can set this with the drop-down menu pictured below:

<figure><img src="/files/kg9Yiex4f6r2qJSIip7k" alt=""><figcaption></figcaption></figure>

If the block is set to go to the next block, you then can configure what the block should do.&#x20;

At each step, the NPC character can also send emotes or change dialog box graphics to feel a bit more immersive. Try creating different versions of your NPC in various facial expressions to reflect the dialog!

<figure><img src="/files/92itsCSeTUznjJdiMm2I" alt=""><figcaption></figcaption></figure>

### There are many options besides just a scripted message!&#x20;

You can do things like create prompts for an AI generated response, have the NPC check for tokens or items before moving to the next block, give items or XP, collect an item and give HTTP requests.&#x20;

We'll go through the many dialogue options and explain how they work.&#x20;


# AI Dialogue

Buenoverse supports AI conversation mechanics for an even more immersive experience for your players. Each interaction will cost AI generation credits which are allotted to your world based on your payment plan.&#x20;

In the dialogue flow chart, click on **Message** and chose **AI conversation**.&#x20;

<figure><img src="/files/EP5ltZeqMyoySke72l7G" alt=""><figcaption></figcaption></figure>

There are a lot of options here - as many as you can imagine! You can write things like moods or quirks, as well as subjects and the things that NPC hates or loves. Just go nuts with it!

<figure><img src="/files/IUXT5SOwDSj2jBjpHxFR" alt=""><figcaption></figcaption></figure>

After you write the characteristics, bring up the preview to test your AI conversation, or just start chatting in your world!

<div><figure><img src="/files/hAxH1ytL1CizDtFaXlF5" alt=""><figcaption></figcaption></figure> <figure><img src="/files/au0Gpow51iJFET7iNQjv" alt=""><figcaption></figcaption></figure></div>


# Permissions

NPC's are one of the core building blocks to making awesome quests. By permission-gating certain information or abilities, you can set up scenarios where users have to solve puzzles or collect items in order to continue on to the next step!

In the Dialogue flow chart, click on **Message** and chose **Check Permissions**. Here, you can select what type of permissions you would like to apply to your dialogue.

<figure><img src="/files/gbVCxIrw3tR5EqiUFEBi" alt=""><figcaption></figcaption></figure>

You can create special groups in your address book, or gate responses based on items held, exprience points or levels.&#x20;


# Items and Rewards

Besides permissions, you can also create interactions between your players and your NPCs with item exchanges or rewards for a job well done.

In the dialogue flow chart, click on **Message** and chose whether you'd like the player to give an item, recieve an item, have the item checked, or be given an XP reward.&#x20;

<figure><img src="/files/l5ZG56Wyr5gcdpcrhfT6" alt=""><figcaption></figcaption></figure>

After selecting Check or Take item, A dialogue box appears with an empty space to add or change the component, Clicking the pencil icon allows you to choose a component from a list of components available in the room selected. The dialogue then splits into two options: successful verification or unsuccessful. You can then expand the dialogue tree in both cases. Take item will have the NPC remove the item/s from your inventory, you can adjust how many under quantity.&#x20;

<figure><img src="/files/s3Ini1ThvQqtusAQNeAE" alt=""><figcaption><p>Selecting a Component for Check item</p></figcaption></figure>

Having an NPC give you an item is simpler, simply click the pencil select the component and quantity, and continue your dialogue!

<figure><img src="/files/dSnueOuzToLjY3fyFy91" alt=""><figcaption><p>Empty Give Item Dialogue</p></figcaption></figure>

{% hint style="info" %}
You'll need to have created the item in your world as a component in order to give, exchange, or receive in a dialogue.&#x20;
{% endhint %}

Try having your NPCs give XP or an item for completing certain quests. The best part of quests are the rewards!


# Collect Data

Link a Bueno form to an NPC in your Buenoverse.

With the **collect data** option, you can use your NPCs to gather information from your Buenoverse players via a Bueno form.&#x20;

Bueno forms are great for setting up contact information for raffles, event registrations, allowlists and more! You can learn more about forms [here](https://docs.bueno.art/v/bueno-forms/introduction/overview).&#x20;

<figure><img src="/files/QnWQFq1hYwH3UzzK7R35" alt=""><figcaption></figcaption></figure>

To connect a Bueno form, select **Collect data** and pick your form from the drop-down menus.&#x20;

<figure><img src="/files/E2kaICfwl1bTb9HPteSw" alt=""><figcaption></figcaption></figure>

Now, when a player interacts with the NPC, the NPC will walk them through the form directly from the world!

<figure><img src="/files/IRb7T7i8C1v4ne4HTD4m" alt=""><figcaption></figcaption></figure>


---

[Next Page](/llms-full.txt/1)